fastDfs图片访问格式和Freemarker模板引擎的使用
使用vue的富文本编辑器操作
vue的富文本编辑器使用以及多图片文件上传与回显
菜单权限和按钮权限的实现,以及JWT的使用
一. 概述
- 一个系统中用户登陆之后看到的菜单,必须是当前登录人拥有权限的菜单才能展示,没有权限的菜单直接不显示;
- 使用无状态token方案,登录只存储了loginInfo信息,没有登录人相关的权限(菜单、按钮权限);
- 难道我们在登录的时候需要将登录人相关的权限信息也一并存储到redis中码?
答:如果人数多,并发量大,redis就不是一个好的方案:redis是一个内存数据库,内存有局限,数据量越大,内存占用率高,影响读取性能。
二. 无状态的token方案
后端验证登录信息成功之后,会生成一个随机串作为token将用户信息保存在redis,并将token令牌传回给浏览器;
后续浏览器只需要将token携带到服务器,服务器就可以根据浏览器的token令牌获取redis的信息
- 如果获取不到信息,说明token令牌无效
- 获取到信息,就向客户端返回请求的数据
缺点:
每次请求都需要查库【查询redis数据库】,效率低
如果redis保存的数据多【用户登录信息,当前用户的权限信息,当前用户的菜单信息】,会影响性能。
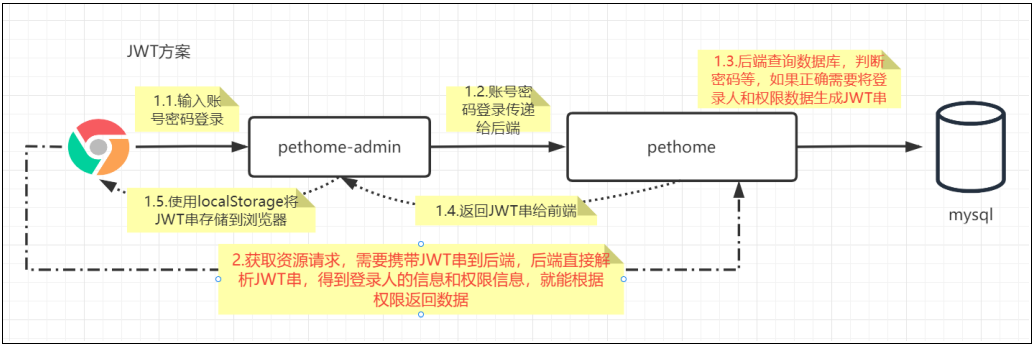
三. JWT方案
1. 为什么要用JWT ?
如果将登录信息放在redis - 只存登录信息也还行
如果1.并发量高  2.保存的不只是登录信息,还有菜单和权限  redis保存的数据就非常多。redis内存数据库,影响服务器的性能

jwt:登录成功,把登录信息还有菜单和权限进行加密【jwt - json web token = 加密之后的字符串】
将jwt保存在浏览器的localStorage中
2. 什么是JWT
JSON Web Token【JWT】是一个非常轻巧的规范。这个规范允许我们使用JWT在用户和服务器之间传递安全可靠的信息
通俗地说,JWT的本质就是一个字符串,它是将用户信息保存到一个Json字符串中,然后进行编码后得到一个JWT token,并且这个JWT token带有签名信息,接收后可以校验是否被篡改。所以可以用于在各方之间安全地将信息作为Json对象传输。
服务器生成JWT token后,响应给浏览器客户端。客户端保存起来。在后续的请求中,客户端将JWT token连同请求内容一起发送给服务器,服务器收到请求后通过JWT token验证用户,如果验证不通过则不返回请求的数据 。验证通过就会向客户端返回请求的数据。
总结:使用JWT生产的Token是安全的,可以理解成就是在无状态的token方案基础上,将token从随机串换成包含登录人信息、权限等内容,且做了加密处理之后的串,实现了数据的安全传输。
3. JWT特点
- 基于JSON,方便解析,因为JSON的通用性,所以JWT可以跨语言支持
- 可以在令牌中定义内容,方便扩展。他不是一个随机token串,而是可以携带自定义内容的加密token串
- 使用非对称加密算法中提供数字签名,JWT防篡改
- 后端服务使用JWT可以不依赖redis即可完成权限校验
4. JWT组成
JWT是由三段信息构成的,将这三段信息文本用.链接一起就构成了JWT字符串。就像这样:
eyJhbGciOiJIUzI1NiIsInR5cCI6IkpXVCJ9.eyJzdWIiOiIxMjM0NTY3ODkwIiwibmFtZSI6IkpvaG4gRG9lIiwiYWRtaW4iOnRydWV9.TJVA95OrM7E2cBab30RMHrHDcEfxjoYZgeFONFh7HgQ
第一部分:我们称它为头部(header),用于存放token类型和加密协议,一般都是固定的
第二部分:我们称其为载荷(payload),用户数据就存放在里面
第三部分:是签证(signature),主要用于服务端的验证
头部【header】: JSON格式,描述JWT的最基本的信息:
{
  'typ': 'JWT',
  'alg': 'HS256'
}
jwt 的头部承载两部分信息:
- 声明类型 , 告知这里是 jwt
- 声明加密的算法 通常直接使用 HMAC, SHA256
在使用过程中会对该
JSON进行BASE64编码,得到Jwt的第一部分:eyJhbGciOiJIUzI1NiIsInR5cCI6IkpXVCJ9载荷【playload】 :JSON格式,用户数据就存放在里面,也需要BASE64编码:
{
  "sub": "1234567890",
  "name": "John Doe",
  "admin": true
}
然后将其进行BASE64加密,得到Jwt的第二部分:
eyJzdWIiOiIxMjM0NTY3ODkwIiwibmFtZSI6IkpvaG4gRG9lIiwiYWRtaW4iOnRydWV9

载荷playload也包含三部分:
1. 标准中注册的声明(建议但不强制使用)
    iss: jwt签发者
    sub: jwt所面向的用户zs
    aud: 接收jwt的一方
    exp: jwt的过期时间,这个过期时间必须要大于签发时间
    nbf: 定义在什么时间之前,该jwt都是不可用的
    iat: jwt的签发时间
    jti: jwt的唯一身份标识,主要用来作为一次性token
2. 公共的声明:公共的声明可以添加任何的信息,一般添加用户的相关信息或其他业务需要的必要信息.但不建议添加敏感信息,因为该部分在客户端可解密
3. 私有的声明:私有声明是提供者和消费者所共同定义的声明,一般不建议存放敏感信息,因为base64是对称解密的,意味着该部分信息可以归类为明文信息
签名 【signature】: jwt的第三部分是一个签证信息,通过指定的算法生成哈希,以确保数据不会被篡改,这个签证信息由三部分组成:
head(base64编码后的)
playload(base64编码后的)
secret(秘钥)
这个部分需要
BASE64加密后的header和BASE64加密后的payload使用.连接组成的字符串,然后通过header中声明的加密方式进行加盐secret组合加密,然后就构成了jwt的第三部分:let encodedString = base64UrlEncode(header) + '.' + base64UrlEncode(payload); let signature = HMACSHA256(encodedString, '密钥');加密之后,得到signature签名信息,即
Jwt的第三部分:TJVA95OrM7E2cBab30RMHrHDcEfxjoYZgeFONFh7HgQ将这三部分用
.连接成一个完整的字符串,就构成了最终的Jwt:eyJhbGciOiJIUzI1NiIsInR5cCI6IkpXVCJ9.eyJzdWIiOiIxMjM0NTY3ODkwIiwibmFtZSI6IkpvaG4gRG9lIiwiYWRtaW4iOnRydWV9.TJVA95OrM7E2cBab30RMHrHDcEfxjoYZgeFONFh7HgQ
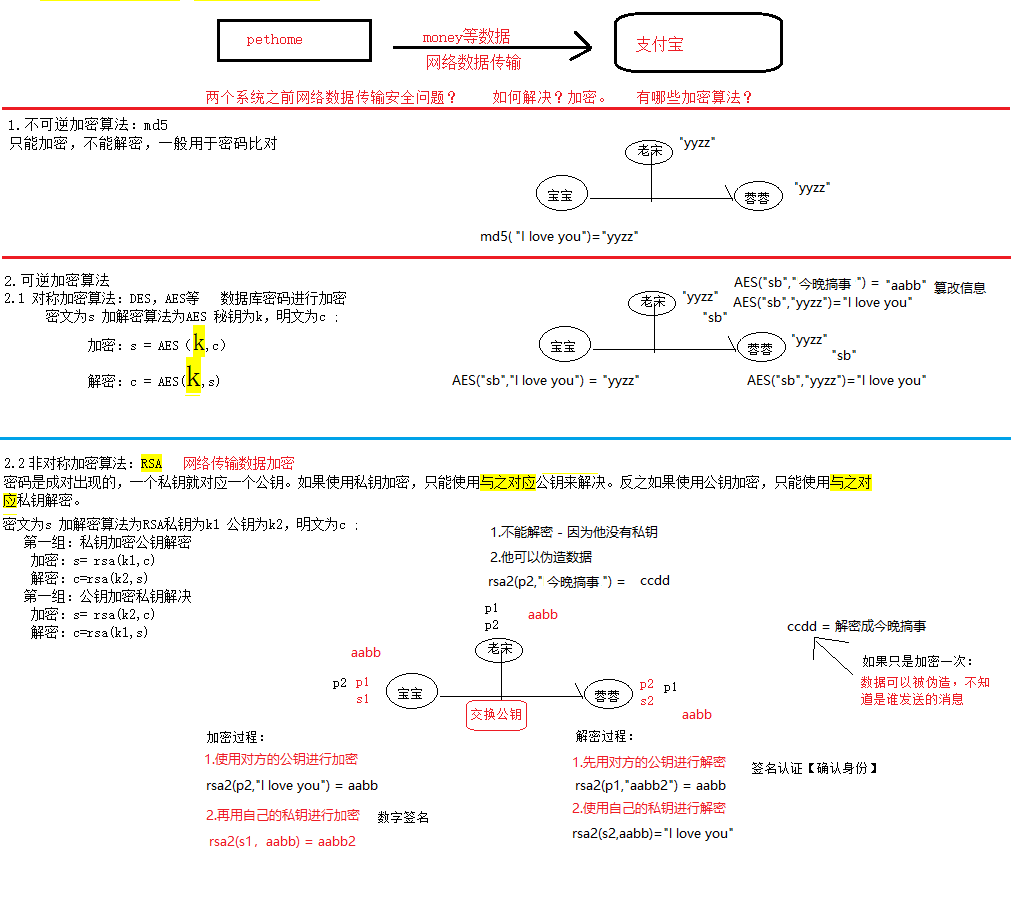
四. 加密算法介绍
明文:加密之前的内容,原始内容
暗文:加密之后的内容
公钥:可见的公共的钥匙
私钥:不可见的私有的钥匙
1. 不可逆加密算法
特征:只能加密不能解密
技术:md5
作用:一般对登录密码处理,用于做密码比对
问题:只能加密,不能解密,不能用来对网络中传输的数据进行加密
2. 可逆对称加密算法
特征:
    1. 可以加密,也可以解密
    2. 加密和解密的密钥是同一个
实现:DES,AES
作用:对数据库密码进行加密
算法:
    密文为s,加解密算法为AES,秘钥为k,明文为c
    加密:s = AES(k,c)
    解密:c = AES(k,s)
问题:
    1. 数据可能会被其他人解密
    2. 数据可能会被篡改
3. 可逆非对称加密算法
特征:
    1. 可以加密,也可以解密
    2. 加密和解密的密钥不是同一个。但是是成对出现的。一个私钥就对应一个公钥。如果使用私钥加密,
       只能使用与之对应公钥来解决。反之如果使用公钥加密,只能使用与之对应私钥解密
实现:RSA,RSA2
作用:网络传输中对数据进行加解密
算法:
    密文为s,加解密算法为RSA私钥为k1,公钥为k2,明文为c
    第一组:私钥加密公钥解密
        加密:s = rsa(k1,c)
        解密:c = rsa(k2,s)
    第二组:公钥加密私钥解决
        加密:s = rsa(k2,c)
        解密:c = rsa(k1,s)
注意:加密一次不安全,要加密两次,解密两次。第一次加密和解密并不是真正的数据,而是数字签名和签名认证/确认身份
4. .网络加密技术有哪些?
1.不可逆【只能加密不能解密】的加密技术:md5
用来对比密码,不能用来传输数据
2.可逆【可以加密也能解密】对称【加密和解密使用的是同一个秘钥】加密算法:AES,DES
风险:截取数据
篡改数据
3.可逆非对称【加密和解密使用的不是同一个秘钥,使用公钥和私钥】
前提:交换公钥
加密:篡改数据
加密2次,解密2次:
先用对方的公钥加密,然后再用自己的私钥加密
先用对方的公钥解密,然后再用自己的私钥解密
五. 常用工具类
生成JWT,需要先获取公钥,私钥
1. 依赖
    <!--     JWT   -->
        <dependency>
            <groupId>io.jsonwebtoken</groupId>
            <artifactId>jjwt</artifactId>
            <version>0.9.1</version>
        </dependency>

        <dependency>
            <groupId>joda-time</groupId>
            <artifactId>joda-time</artifactId>
            <version>2.10.11</version>
        </dependency>
2. RsaUtils
package io.coderyeah.basic.jwt;

import java.io.File;
import java.io.IOException;
import java.nio.file.Files;
import java.security.*;
import java.security.spec.InvalidKeySpecException;
import java.security.spec.PKCS8EncodedKeySpec;
import java.security.spec.X509EncodedKeySpec;
import java.util.Base64;

/**
 * RSA工具类   负责对RSA密钥的创建、读取功能(公钥和私钥)
 */
public class RsaUtils {

    private static final int DEFAULT_KEY_SIZE = 2048;  // 生成的大小

    /**
     * 从文件中读取公钥
     *
     * @param filename 公钥保存路径,相对于classpath
     * @return 公钥对象
     * @throws Exception
     */
    public static PublicKey getPublicKey(String filename) throws Exception {
        byte[] bytes = readFile(filename);
        return getPublicKey(bytes);
    }


    /**
     * 从文件中读取密钥
     *
     * @return 私钥对象
     * @throws Exception
     */
    public static PrivateKey getPrivateKey(String filename) throws Exception {
        byte[] bytes = readFile(filename);
        return getPrivateKey(bytes);
    }

    /**
     * 获取公钥
     *
     * @param bytes 公钥的字节形式
     * @return
     * @throws Exception
     */
    public static PublicKey getPublicKey(byte[] bytes) {
        try{
            bytes = Base64.getDecoder().decode(bytes);
            X509EncodedKeySpec spec = new X509EncodedKeySpec(bytes);
            KeyFactory factory = KeyFactory.getInstance("RSA");
            return factory.generatePublic(spec);
        }catch (Exception e){
            e.printStackTrace();
            return null;
        }
    }

    /**
     * 获取密钥
     *
     * @param bytes 私钥的字节形式
     * @return
     * @throws Exception
     */
    public static PrivateKey getPrivateKey(byte[] bytes) throws NoSuchAlgorithmException, InvalidKeySpecException {
        bytes = Base64.getDecoder().decode(bytes);
        PKCS8EncodedKeySpec spec = new PKCS8EncodedKeySpec(bytes);
        KeyFactory factory = KeyFactory.getInstance("RSA");
        return factory.generatePrivate(spec);
    }

    /**
     * 根据密文,生存rsa公钥和私钥,并写入指定文件
     *
     * @param publicKeyFilename  公钥文件路径
     * @param privateKeyFilename 私钥文件路径
     * @param secret             生成密钥的密文
     */
    public static void generateKey(String publicKeyFilename,
                                   String privateKeyFilename,
                                   String secret, int keySize) throws Exception {
        KeyPairGenerator keyPairGenerator = KeyPairGenerator.getInstance("RSA");
        SecureRandom secureRandom = new SecureRandom(secret.getBytes());
        keyPairGenerator.initialize(Math.max(keySize, DEFAULT_KEY_SIZE), secureRandom);
        KeyPair keyPair = keyPairGenerator.genKeyPair();
        // 获取公钥并写出
        byte[] publicKeyBytes = keyPair.getPublic().getEncoded();
        publicKeyBytes = Base64.getEncoder().encode(publicKeyBytes);
        writeFile(publicKeyFilename, publicKeyBytes);
        // 获取私钥并写出
        byte[] privateKeyBytes = keyPair.getPrivate().getEncoded();
        privateKeyBytes = Base64.getEncoder().encode(privateKeyBytes);
        writeFile(privateKeyFilename, privateKeyBytes);
    }

    private static byte[] readFile(String fileName) throws Exception {
        return Files.readAllBytes(new File(fileName).toPath());
    }

    private static void writeFile(String destPath, byte[] bytes) throws IOException {
        File dest = new File(destPath);
        if (!dest.exists()) {
            dest.createNewFile();
        }
        Files.write(dest.toPath(), bytes);
    }


    public static void main(String[] args) throws Exception{
        //1 生成秘钥对 xxx_rsa.pub xxxx_rsa
        generateKey("E:\\springboot\\pethome\\src\\main\\resources\\auth_rsa.pub",
                "E:\\springboot\\pethome\\src\\main\\resources\\auth_rsa.pri","coderyeah",2048);
    }
}
3. JwtUtils
package io.coderyeah.basic.jwt;

import com.alibaba.fastjson.JSONObject;
import io.jsonwebtoken.Claims;
import io.jsonwebtoken.Jws;
import io.jsonwebtoken.Jwts;
import io.jsonwebtoken.SignatureAlgorithm;
import org.joda.time.DateTime;

import java.security.PrivateKey;
import java.security.PublicKey;
import java.util.Base64;
import java.util.UUID;

/**
 * JWT 密钥的解析和加密 工具类
 */
public class JwtUtils {

    private static final String JWT_PAYLOAD_USER_KEY = "user";


    private static String createJTI() {
        return new String(Base64.getEncoder().encode(UUID.randomUUID().toString().getBytes()));
    }
    /**
     * 私钥加密token
     *
     * @param userInfo   载荷中的数据
     * @param privateKey 私钥
     * @param expire     过期时间,单位分钟
     * @return JWT
     */
    public static String generateTokenExpireInMinutes(Object userInfo, PrivateKey privateKey, int expire) {
        return Jwts.builder()
                .claim(JWT_PAYLOAD_USER_KEY, JSONObject.toJSONString(userInfo))
                .setId(createJTI())
                //当前时间往后加多少分钟
                .setExpiration(DateTime.now().plusMinutes(expire).toDate())
                .signWith(SignatureAlgorithm.RS256,privateKey)
                .compact();

    }

    /**
     * 私钥加密token
     *
     * @param userInfo   载荷中的数据
     * @param privateKey 私钥
     * @param expire     过期时间,单位秒
     * @return JWT
     */
    public static String generateTokenExpireInSeconds(Object userInfo, PrivateKey privateKey, int expire) {
        return Jwts.builder()
                .claim(JWT_PAYLOAD_USER_KEY, JSONObject.toJSONString(userInfo))
                .setId(createJTI())
                .setExpiration(DateTime.now().plusSeconds(expire).toDate())
                .signWith(SignatureAlgorithm.RS256,privateKey)
                .compact();
    }

    /**
     * 公钥解析token
     *
     * @param token     用户请求中的token
     * @param publicKey 公钥
     * @return Jws<Claims>
     */
    private static Jws<Claims> parserToken(String token, PublicKey publicKey) {
        return Jwts.parser().setSigningKey(publicKey).parseClaimsJws(token);
    }


    /**
     * 获取token中的用户信息
     *
     * @param token     用户请求中的令牌
     * @param publicKey 公钥
     * @return 用户信息
     */
    public static <T> Payload<T> getInfoFromToken(String token, PublicKey publicKey, Class<T> userType) {
        Jws<Claims> claimsJws = parserToken(token, publicKey);
        Claims body = claimsJws.getBody();
        Payload<T> claims = new Payload<>();
        claims.setId(body.getId());
        T t = JSONObject.parseObject(body.get(JWT_PAYLOAD_USER_KEY).toString(),userType);
        claims.setLoginData(t);
        claims.setExpiration(body.getExpiration());
        return claims;
    }

    /**
     * 获取token中的载荷信息
     *
     * @param token     用户请求中的令牌
     * @param publicKey 公钥
     * @return 用户信息
     */
    public static <T> Payload<T> getInfoFromToken(String token, PublicKey publicKey) {
        Jws<Claims> claimsJws = parserToken(token, publicKey);
        Claims body = claimsJws.getBody();
        Payload<T> claims = new Payload<>();
        claims.setId(body.getId());
        claims.setExpiration(body.getExpiration());
        return claims;
    }


    public static void main(String[] args) throws Exception {
        // 1 获取token
        PrivateKey privateKey = RsaUtils.getPrivateKey(JwtUtils.class.getClassLoader().getResource("auth_rsa.pri").getFile());
        System.out.println(privateKey);
        String token = generateTokenExpireInSeconds(new User(1L, "zs"), privateKey, 10);
        System.out.println(token);

        // 2 解析token里面内容
        PublicKey publicKey = RsaUtils.getPublicKey(JwtUtils.class.getClassLoader().getResource("auth_rsa.pub").getFile());
        Payload<User> payload = getInfoFromToken(token, publicKey, User.class);
        System.out.println(payload);
        Thread.sleep(11000); //超时后继续解析

    }
}

class User{
    private Long id;
    private String name;

    public Long getId() {
        return id;
    }

    public void setId(Long id) {
        this.id = id;
    }

    public String getName() {
        return name;
    }

    public void setName(String name) {
        this.name = name;
    }

    @Override
    public String toString() {
        return "User{" +
                "id=" + id +
                ", name='" + name + '\'' +
                '}';
    }

    public User() {
    }

    public User(Long id, String name) {
        this.id = id;
        this.name = name;
    }
}
4. 载荷数据
package io.coderyeah.basic.jwt;

import java.util.Date;

public class Payload<T> {

    private String id;  // jwt的id(token)
    private T loginData;  // 用户信息:用户数据,不确定,可以是任意类型
    private Date expiration;  // 过期时间

    public String getId() {
        return id;
    }

    public void setId(String id) {
        this.id = id;
    }

    public T getLoginData() {
        return loginData;
    }

    public void setLoginData(T loginData) {
        this.loginData = loginData;
    }

    public Date getExpiration() {
        return expiration;
    }

    public void setExpiration(Date expiration) {
        this.expiration = expiration;
    }

    @Override
    public String toString() {
        return "Payload{" +
                "id='" + id + '\'' +
                ", loginData=" + loginData +
                ", expiration=" + expiration +
                '}';
    }
}
5. 需要保存到前端的数据
LoginData
package io.coderyeah.basic.jwt;

import io.coderyeah.system.domain.Menu;
import io.coderyeah.user.domain.LoginInfo;
import io.coderyeah.user.domain.User;
import lombok.Data;

import java.util.List;

@Data
public class LoginData {
   //1.登录信息对象Lonininfo对象 - 在前端显示用户数据信息的【
    private Logininfo logininfo;
    //2.当前登录人的所有权限的sn - 按钮或资源权限【没有访问该资源的按钮直接不显示】
    private List<String> permissions;
    //3.当前登录人的菜单信息 - 菜单权限【不同的人登录之后菜单是不一样的】
    private List<Menu> menus;
}
六. 业务实现
1. 用户登录成功后使用jwt返回客户端数据
 // 对登录成功的用户信息进行jwt加密
    private Map<String, Object> loginSuccessJwtHandler(LoginInfo loginInfo) {
        final HashMap<String, Object> map = new HashMap<>();
        final LoginData loginData = new LoginData();
        // 登录信息
        loginInfo.setSalt(null);
        loginInfo.setPassword(null);
        map.put("loginInfo", loginInfo);
        loginData.setLoginInfo(loginInfo);
        if (loginInfo.getType() == 0) {// 管理员用户
            // 获取登录用户所有权限
            final List<String> permissions = employeeMapper.getPermissionSnByLoginInfoId(loginInfo.getId());
            map.put("permissions", permissions);
            loginData.setPermissions(permissions);
            // 获取登录用户所有菜单
            List<Menu> menus = employeeMapper.getMenus(loginInfo.getId());
            map.put("menus", menus);
            loginData.setMenus(menus);
        }
        try {
            // 生成私钥
            final PrivateKey privateKey = RsaUtils.getPrivateKey(LoginInfoServiceImpl.class.getClassLoader().getResource("auth_rsa.pri").getFile());
            // 使用私钥对登录数据进行加密
            final String token = JwtUtils.generateTokenExpireInMinutes(loginData, privateKey, 30);
            map.put("token", token);
        } catch (Exception e) {
            e.printStackTrace();
        }
        return map;
    }
获取登录用户所有菜单
 <resultMap id="menuMap" type="io.coderyeah.system.domain.Menu">
        <id property="id" column="mid"/>
        <result property="name" column="mname"/>
        <result property="icon" column="micon"/>
        <collection property="children" ofType="io.coderyeah.system.domain.Menu">
            <id property="id" column="id"/>
            <result property="name" column="name"/>
            <result property="component" column="component"/>
            <result property="url" column="url"/>
            <result property="icon" column="icon"/>
            <result property="index" column="index"/>
            <result property="parentId" column="parent_id"/>
            <result property="intro" column="intro"/>
            <result property="state" column="state"/>
        </collection>
    </resultMap>

<select id="getMenus" resultMap="menuMap">
    select tm1.id mid, tm1.name mname, tm1.icon micon, tm2.*
    from t_menu tm1
             join
         (
             select tm.*
             from t_employee te
                      join t_employee_role ter on te.id = ter.employee_id
                      join t_role tr on tr.id = ter.role_id
                      join t_role_menu trm on tr.id = trm.role_id
                      join t_menu tm on trm.menu_id = tm.id
             where te.logininfo_id = #{id}
         ) tm2
         on tm1.id = tm2.parent_id
</select>
2. 账号登录(示例)
 // 账户登录
    @Override
    public Map<String, Object> accountLogin(LoginDto loginDto) {
        // 效验空值
        if (StrUtil.isBlank(loginDto.getAccount()) || StrUtil.isBlank(loginDto.getCheckPass())) {
            throw new BusinessException("信息不能为空!!!");
        }
        // 账号效验
        LoginInfo loginInfo = checkLogin(loginDto);
        // 效验密码
        if (!DigestUtil.md5Hex(loginInfo.getSalt() + loginDto.getCheckPass()).equals(loginInfo.getPassword())) {
            throw new BusinessException("账号或密码错误!!!");
        }
        if (!loginInfo.getDisable()) {
            throw new BusinessException("该账号被禁用,请联系管理员!!!");
        }
//        生成token,并将登录信息保存到redis数据库,设置30有效
        final Map<String, Object> map = loginSuccessJwtHandler(loginInfo);
        return map;
    }
3. 登录拦截器核心代码
//1.获取token
String token = req.getHeader("token");
//3.如果有token,通过token获取redis的登录信息
if (token != null) {
     LoginInfo info=null;
    try {
        // (私钥加密)获取公钥解密
        final PublicKey publicKey = RsaUtils.getPublicKey(LoginInterceptor.class.getClassLoader().getResource("auth_rsa.pub").getFile());
        // 获取用户信息
        final Payload<LoginData> payload = JwtUtils.getInfoFromToken(token, publicKey, LoginData.class);
        info = payload.getLoginData().getLoginInfo();
    } catch (ExpiredJwtException e) { //jwt过期时抛出的异常
        resp.setContentType("application/json;charset=UTF-8");
        resp.getWriter().println("{\"success\":false,\"message\":\"timeout\"}");
        return false;
    }
4.前端后置拦截器
//======================axios的后置拦截器【处理后台登录拦截的结果】====================//
axios.interceptors.response.use(res => {
    //后端响应的是没有登录的信息
    if (false === res.data.success && "noLogin" === res.data.message) {
        localStorage.removeItem("token");
        localStorage.removeItem("loginInfo");
        localStorage.removeItem("menus");
        localStorage.removeItem("permissions");
        router.push({path: '/login'});
    }
    if (false === res.data.success && "noPermission" === res.data.message) {
        Message.warning('您没有访问权限')
    }
    if (false === res.data.success && "timeout" === res.data.message) {
        localStorage.removeItem("token");
        localStorage.removeItem("loginInfo");
        localStorage.removeItem("menus");
        localStorage.removeItem("permissions");
        Message.error('超时啦')
    }
    return res;
}, error => {
    Promise.reject(error)
})
//======================axios的后置拦截器【处理后台登录拦截的结果】====================//
5. 登录成功时需要存储信息到浏览器本地
this.$message({
  message: "登录成功",
  type: 'success'
});
let {token, loginInfo, menus, permissions} = res.data.data
localStorage.setItem("token", token)
localStorage.setItem("loginInfo", JSON.stringify(loginInfo))
localStorage.setItem("menus", JSON.stringify(menus))
localStorage.setItem("permissions", JSON.stringify(permissions))
七. 动态菜单
1. router.js中的需要动态展示的路由配置需要去掉 (保留5个)
import Login from './views/Login.vue'
import NotFound from './views/404.vue'
import Home from './views/Home.vue'
import echarts from './views/charts/echarts.vue'
const ShopRegister = () => import('./views/ShopRegister')

let routes = [
    {
        path: '/register',
        component: ShopRegister,
        name: '',  //不需显示name没有意义
        hidden: true //不需要在菜单显示
    },
    {
        path: '/login',
        component: Login,
        name: '',
        hidden: true
    },
    {
        path: '/404',
        component: NotFound,
        name: '',
        hidden: true
    },

    {
        path: '/',
        component: Home,
        name: '图形化数据展示',
        iconCls: 'el-icon-s-data',
        children: [
            {path: '/echarts', component: echarts, name: 'echarts'}
        ]
    },
    {
        path: '*',
        hidden: true,
        redirect: {path: '/404'}
    }
];

export default routes;
2.login.vue页面登录成功之后需要刷新一下本地的路由缓存
let {token, loginInfo, menus, permissions} = res.data.data
localStorage.setItem("token", token)
localStorage.setItem("loginInfo", JSON.stringify(loginInfo))
localStorage.setItem("menus", JSON.stringify(menus))
localStorage.setItem("permissions", JSON.stringify(permissions))
console.log(res.data);
//跳转到后台首页
this.$router.push({path: '/echarts'});
// 刷新路由缓存
location.reload()
3. main.js配置动态路由(vue中的@符号表示在src路径下)
//处理页面刷新动态路由失效问题
initIndexRouters();

function initIndexRouters() {
    // 判断本地是否有当前用户的菜单权限
    if (!localStorage.menus) {
        return;
    }
    //防止重复配置路由:5就是main.js中路由的个数 - 如果你的静态路由是6个这里要写成6
    if (router.options.routes.length > 5) {
        return;
    }
    // 获取本地登录用户的菜单
    let menus = localStorage.getItem('menus');
    // 将保存在本地的json字符串转化为json对象
    menus = JSON.parse(menus);
    let tempRouters = [];
    // 遍历当前用户所有的菜单
    menus.forEach(menu => {
        let indexRouter = {
            path: '/',
            iconCls: menu.icon,
            name: menu.name,
            component: resolve => require(['@/views/Home'], resolve),
            children: []
        }
        // 遍历所有子级菜单
        menu.children.forEach(cMenu => {
            let cr = {
                path: cMenu.url,
                name: cMenu.name,
                iconCls: cMenu.icon,
                component: resolve => require(['@/views/' + cMenu.component], resolve)
            }
            indexRouter.children.push(cr)
        })
        tempRouters.push(indexRouter)
        router.options.routes.push(indexRouter)
    })
    //动态路由配置
    router.addRoutes(tempRouters);
}
八. 按钮权限的实现
1. 获取当前登录用户的所有权限
前面登录成功会将登录人的权限数据封装permissions并返回给前端
<select id="getPermissionSnByLoginInfoId" resultType="java.lang.String">
    select tp.sn
    from t_employee te
             join t_employee_role ter on te.id = ter.employee_id
             join t_role tr on ter.role_id = tr.id
             join t_role_permission trp on tr.id = trp.role_id
             join t_permission tp on tp.id = trp.permission_id
    where te.logininfo_id = #{id}
</select>
2. 自定义vue指令
语法格式:
Vue.directive('指令名', {
    // 当被绑定的元素插入到 DOM 中时……
    inserted: (el, binding, vnode) => {
       // 需要完成的操作。。。
    }
});
3. 定义vue权限指令
可在
src/common/js/permission.js中定义权限指令import Vue from 'vue'; // 注册一个全局自定义指令 `v-perm` Vue.directive('perm', { // 当被绑定的元素插入到 DOM 中时…… inserted: (el, binding, vnode) => { //获取自定义标签v-perm的值 const value = binding.value; //json格式字符串 let permissions = localStorage.getItem('permissions'); if (permissions) { //转成json对象 let auths = JSON.parse(permissions); //将数组中的每一个元素按照,号进行拼接 然后 再检索 if (auths.join(",").indexOf(value) == -1) { //如果不包含权限就移除 el.parentNode.removeChild(el); } } } });
4. 在main.js中引用
import permission from './common/js/permission'
//@ 等价于 /src 这个目录,避免写麻烦又易错的相对路径
import '@/common/js/permission'
5. 使用举例
<el-form-item>
    <el-button type="primary" v-on:click="keywordQuery" v-perm="'department:list'" >
        关键字查询
    </el-button>
</el-form-item>
<el-form-item>
    <el-button type="primary" v-perm="'department:save'" @click="handleAdd">
        新增
    </el-button>
</el-form-item>

<el-button size="small" v-perm="'department:update'" @click="handleEdit(scope.$index, scope.row)">编辑</el-button>
<el-button type="danger" size="small" v-perm="'department:delete'" @click="handleDel(scope.$index, scope.row)">删除</el-button>
怎么实现对登录用户访问权限的拦截
一. 自定义权限注解
package io.coderyeah.basic.annotation;

import java.lang.annotation.*;

/**
 * 自定义注解
 */
@Target({ElementType.METHOD, ElementType.TYPE})
@Documented
@Retention(RetentionPolicy.RUNTIME)
public @interface PreAuthorize {
    String name();

    String sn();
}
二. 在接口方法上使用注解
/**
 * @param deptDTO 部门查询参数
 * @return Result
 */
@PreAuthorize(name = "部门列表", sn = "department:list")
@LogAnnotation(module = "部门模块", operate = "分页查询部门列表")
@ApiOperation("查询部门列表")
@PostMapping("/list")
public Result list(@RequestBody(required = false) DeptDTO deptDTO) {
    return departmentService.list(deptDTO);
}
三. 登录拦截器
package io.coderyeah.basic.interceptor;

import com.alibaba.fastjson.JSON;
import io.coderyeah.basic.annotation.PreAuthorize;
import io.coderyeah.basic.constant.Constants;
import io.coderyeah.org.mapper.EmployeeMapper;
import io.coderyeah.user.domain.LoginInfo;
import org.springframework.beans.factory.annotation.Autowired;
import org.springframework.data.redis.core.StringRedisTemplate;
import org.springframework.stereotype.Component;
import org.springframework.web.method.HandlerMethod;
import org.springframework.web.servlet.HandlerInterceptor;
import org.springframework.web.servlet.ModelAndView;

import javax.servlet.http.HttpServletRequest;
import javax.servlet.http.HttpServletResponse;
import java.io.PrintWriter;
import java.util.List;
import java.util.concurrent.TimeUnit;

@Component
public class LoginInterceptor implements HandlerInterceptor {
    @Autowired
    private StringRedisTemplate stringRedisTemplate;
    @Autowired
    private EmployeeMapper employeeMapper;

    @Override
    public boolean preHandle(HttpServletRequest req, HttpServletResponse resp, Object handler) throws Exception {
        // 静态资源放行
        if (!(handler instanceof HandlerMethod)) {
            return true;
        }

        //1.获取token
        String token = req.getHeader("token");
        //3.如果有token,通过token获取redis的登录信息
        if (token != null) {
            String loginInfo = stringRedisTemplate.opsForValue().get(Constants.LOGIN_TOKEN + token); // LoginInfo对象
            if (loginInfo != null) {//登录成功,而且没有过期
                //5.如果登录信息不为null - 放行 + 刷新过期时间[重新添加到redis]
                stringRedisTemplate.opsForValue().set(Constants.LOGIN_TOKEN + token, loginInfo, 30, TimeUnit.MINUTES);
                final LoginInfo info = JSON.parseObject(loginInfo, LoginInfo.class);
                if (info.getType() == 1) {
                    // 前端用户直接放行
                    return true;
                }
                // 后端管理员 需要判断权限
                final HandlerMethod handlerMethod = (HandlerMethod) handler;
                // 获取访问的方法上的权限注解
                final PreAuthorize p = handlerMethod.getMethodAnnotation(PreAuthorize.class);
                if (null == p) {
                    // 此方法上没有该注解直接放行 公用资源
                    return true;
                }
                // 需要判断该登录用户是否具备此接口的操作权限
                final String sn = p.sn();
                // 查询该登录用户的所有权限集合
                List<String> ownPermissions = employeeMapper.getPermissionSnByLoginInfoId(info.getId());
                if (ownPermissions.contains(sn)) {
                    // 包含该权限
                    return true;
                }
                // 没有权限返回json信息给客户端
                resp.setCharacterEncoding("UTF-8");
                resp.setContentType("application/json;charset=utf-8");
                final PrintWriter writer = resp.getWriter();
                writer.print("{\"success\":false,\"message\":\"noPermission\"}");
                writer.close();
                return false;
            }
        }
        resp.setContentType("application/json;charset=UTF-8");
        resp.getWriter().println("{\"success\":false,\"message\":\"noLogin\"}");
        return false;
    }
}
四. 查询当前登录用户的所有权限涉及到多张表
<select id="getPermissionSnByLoginInfoId" resultType="java.lang.String">
    select tp.sn
    from t_employee te
             join t_employee_role ter on te.id = ter.employee_id
             join t_role tr on ter.role_id = tr.id
             join t_role_permission trp on tr.id = trp.role_id
             join t_permission tp on tp.id = trp.permission_id
    where te.logininfo_id = #{id}
</select>
五. 前端后置拦截器处理
//======================axios的后置拦截器【处理后台登录拦截的结果】====================//
axios.interceptors.response.use(res => {
    //后端响应的是没有登录的信息
    if (false === res.data.success && "noLogin" === res.data.message) {
        localStorage.removeItem("token");
        localStorage.removeItem("loginInfo");
        router.push({path: '/login'});
    }
    if (false === res.data.success && "noPermission" === res.data.message) {
      Message.info('您没有访问权限')
    }
    return res;
},error => {
    Promise.reject(error)
})
//======================axios的后置拦截器【处理后台登录拦截的结果】====================//
自定义注解实现系统启动时后端权限数据生成
一. 注解介绍
注解Annotation是一种引用数据类型,编译之后也是生成.class类型的java文件
语法:修饰符 @interface 注解类型名
- 注解可以出现在类上、方法上、属性上、甚至注解上等…
- JDK中内置的注解@Override(复写)、@SuppressWarnings(忽略编译器的警告)等
元注解
元注解就是用来修饰注解的,是注解上的注解;常见的元注解有@Target、@Retention、@Documented、@Inherited.
@Target:表示当前注解使用在什么位置
例如1:@Target(ElementType.METHOD)
Target内部的值使用枚举ElementType表示,表示的主要位置有:注解、构造方法、属性、局部变量、函数、包、参数和类(默认值)。
例如2:@Target({ElementType.METHOD,ElementType.TYPE})
多个位置使用数组的写法
@Retention:定义被它所标记的注解能保留多久
Retention注解有一个属性value,是RetentionPolicy类型的,Enum RetentionPolicy是一个枚举类型
这个枚举决定了Retention注解应该如何去保持,也可理解为Rentention搭配 RententionPolicy使用
RetentionPolicy有3个值:CLASS,RUNTIME,SOURCE

@Retention(RetentionPolicy.SOURCE):注解只保留在源文件,当Java文件编译成class文件的时候,注解被遗弃
@Retention(RetentionPolicy.CLASS):注解被保留到class文件,但jvm加载class文件时候被遗弃,这是默认的生命周期
@Retention(RetentionPolicy.RUNTIME):注解不仅被保存到class文件中,jvm加载class文件之后,仍然存在
@Documented:加了这个注解的注解,在生成文档的时候,可以在文档中显示出来
@Documented
public @interface A{
}
@Inherited:加了这个注解的注解,能被继承
@Inherited
public @interface A{
}

@A
class B(){
}

class C extends B{
}
二. 自定义权限注解,项目启动时扫描注解加权限
1. 定义注解
package io.coderyeah.basic.annotation;

import java.lang.annotation.*;

@Target({ElementType.METHOD, ElementType.TYPE})//注解能作用在方法上、类上
//Java中的反射:在运行时,动态获取类的各种信息的一种能力
@Retention(RetentionPolicy.RUNTIME)//可以通过反射读取注解
@Inherited//可以被继承
@Documented//可以被javadoc工具提取成文档,可以不加
public @interface PreAuthorize {
    //对应t_permission表中的sn
    String sn(); //department:patchDel
    //对应t_permission表中的name
    String name(); //部门批量删除
}
以后在方法或类上加了这个@PreAuthorize 注解,都会去执行一段业务代码【例如:添加权限到t_promission】,但是要先扫描这个注解,然后解析这个注解,再去执行相应的业务代码
2. 例子
    @Autowired
    private DepartmentService departmentService;

    /**
     * @param deptDTO 部门查询参数
     * @return Result
     */
    @PreAuthorize(name = "部门列表", sn = "department:list")
    @LogAnnotation(module = "部门模块", operate = "分页查询部门列表")
    @ApiOperation("查询部门列表")
    @PostMapping("/list")
    public Result list(@RequestBody(required = false) DeptDTO deptDTO) {
        return departmentService.list(deptDTO);
    }
3. 扫描注解加权限
注解定义之后,需要扫描。就像业务代码中@Service注解,服务启动的时候就会去扫描,生成业务对象。并注入到Controller使用。如果启动的时候业务代码中没有添加@Service注解,启动会报错的。
4. 自定义的注解怎么扫描呢?而且要在服务器启动的时候自动扫描?
- 可以通过Web三大组件:Servlet、过滤器Filter、监听器Listenter
在SpringBoot项目中,如果想自定义Servlet、Filter、Listenter,我们只需要完成两个步骤:
1. 自己写一个类实现父接口或者继承父类:Spring提供的的Servlet、Filter、Listenter,并在实现类上打上注解
    1.1. 自定义servlet:继承HttpServlet,打注解@WebServlet
      1.2. 自定义Filter:实现Filter,打注解@WebFilter
    1.3. 自定义Listenter:实现ServletContextListener,打注解@WebListener
    注意:SpringBoot项目中没有web.xml,不能通过xml配置实现。但是可以通过注解
2. 交给容器扫描:在启动类上打注解:@ServletComponentScan扫描Servlet、Filter、Listenter的包即可
5 .权限注解扫描监听器
监听器:监听四大作用域的变化和属性的变更
application的类型:ServletContext - 这个对象会在服务器启动的时候自动生成,而且是唯一一个。
package io.coderyeah.system.listener;

import io.coderyeah.system.service.PermissionScanService;
import lombok.extern.slf4j.Slf4j;
import org.springframework.beans.factory.annotation.Autowired;
import javax.servlet.ServletContextEvent;
import javax.servlet.ServletContextListener;
import javax.servlet.annotation.WebListener;

@WebListener//申明自定义的web监听器,被容器注册和使用
@Slf4j
public class PermissionScanInitListener implements ServletContextListener {

    @Autowired
    private IPermissionScanService permissionScanService;

    //spring容器初始化结束之后被调用
    @Override
    public void contextInitialized(ServletContextEvent servletContextEvent) {
        //这里面的业务随着接口的变多,可能执行时间会非常久,影响性能。影响主线程的启动
        new Thread(new Runnable() {//不用主线程去执行,用一个新的线程去执行
            @Override
            public void run() {
                //可以在这里扫描我们自定义的注解@PreAuthorize,然后将信息存储到t_permission表
                //这样就无需手动录入信息到权限t_permission表了
                log.info("权限初始化开始******************************************");
                System.out.println("权限初始化开始******************************************");
                permissionScanService.scanPermission();
                System.out.println("权限初始化结束******************************************");
            }
        }).start();
    }

    //容器销毁的时候执行
    @Override
    public void contextDestroyed(ServletContextEvent servletContextEvent) {
    }
}
6. 启动类
@SpringBootApplication
@MapperScan("io.coderyeah.*.mapper")
//加载Listener - 本来监听器只要服务器一启动就会执行,但是SpringBoot项目中是通过启动类开启服务的,所以要加这个注解去加载listener,listener才会起作用
@ServletComponentScan(value = {"io.coderyeah.system.listener"})
public class PetHomeApplication {
    public static void main(String[] args) {
        SpringApplication.run(PetHomeApplication.class,args);
    }
}
//测试:启动项目就会打印输出信息
7. 业务接口
此业务接口专门用来解析注解@PreAuthorize(name = "部门列表",sn= "department:list")和注解上的参数,并获取出来添加到权限表t_permission。
//1.找包 - 找类 - 找方法 - 找注解
//2.解析这个注解拿到:sn,name
//3.当前方法的url地址
//4.创建一个Permisson对象 - 添加到数据库
package io.coderyeah.system.service.impl;

import com.baomidou.mybatisplus.core.conditions.query.LambdaQueryWrapper;
import com.baomidou.mybatisplus.extension.service.impl.ServiceImpl;
import io.coderyeah.basic.annotation.PreAuthorize;
import io.coderyeah.basic.util.ClassUtils;
import io.coderyeah.system.domain.Permission;
import io.coderyeah.system.mapper.PermissionMapper;
import io.coderyeah.system.service.PermissionService;
import org.springframework.beans.factory.annotation.Autowired;
import org.springframework.stereotype.Service;
import org.springframework.web.bind.annotation.*;

import java.io.File;
import java.io.FileFilter;
import java.lang.annotation.Annotation;
import java.lang.reflect.Method;
import java.util.HashSet;
import java.util.Set;
import java.util.regex.Matcher;
import java.util.regex.Pattern;

/**
 * @author coderyeah
 * @description 针对表【t_permission】的数据库操作Service实现
 * @createDate 2022-09-21 11:00:07
 */
@Service
public class PermissionServiceImpl extends ServiceImpl<PermissionMapper, Permission> implements PermissionService {
    private static final String PKG_PREFIX = "io.coderyeah.";
    private static final String PKG_SUFFIX = ".controller";
    @Autowired
    private PermissionMapper permissionMapper;

    @Override
    public void scanPermission() {
        //获取 io.coderyeah 下面所有的模块目录
        String path = this.getClass().getResource("/").getPath() + "/io/coderyeah/";
        // 当前包路径下的文件对象
        File file = new File(path);
        // 过滤出当前包下所有目录的文件数组
        File[] files = file.listFiles(new FileFilter() {
            @Override
            public boolean accept(File file) {
                return file.isDirectory();
            }
        });

        //获取io.coderyeah.*.controller里面所有的类
        Set<Class> clazzes = new HashSet<>();
        assert files != null;
        for (File fileTmp : files) {
            System.out.println("===============权限注解解析:获取所有的包==============");
            System.out.println(fileTmp.getName());
            // 将所有类对象放进set集合
            clazzes.addAll(ClassUtils.getClasses(PKG_PREFIX + fileTmp.getName() + PKG_SUFFIX));
        }

        // 遍历类对象集合
        for (Class clazz : clazzes) {
            // 获取当前类的所有方法
            Method[] methods = clazz.getMethods();
            // 判断是否有方法存在
            if (methods == null || methods.length < 1) {
                return;
            }
            // 遍历当前类中所有的方法
            for (Method method : methods) {
                // 获取接口执行路径
                String uri = getUri(clazz, method);
                try {
                    PreAuthorize preAuthorizeAnno = method.getAnnotation(PreAuthorize.class);
                    if (preAuthorizeAnno == null) {
                        // 跳出当前循环
                        continue;
                    }
                    String name = preAuthorizeAnno.name();
                    String permissionSn = preAuthorizeAnno.sn();
                    Permission permissionTmp = permissionMapper.selectOne(new LambdaQueryWrapper<Permission>().eq(Permission::getSn, permissionSn));
                    //如果不存在就添加
                    if (permissionTmp == null) {
                        Permission permission = new Permission();
                        permission.setName(name);       //t_permission表中的权限名
                        permission.setSn(permissionSn); //t_permission表中的权限编号
                        permission.setUrl(uri);           //t_permission表中的权限路径
                        permissionMapper.insert(permission);
                    } else {
                        //如果存在就修改
                        permissionTmp.setName(name);
                        permissionTmp.setSn(permissionSn);
                        permissionTmp.setUrl(uri);
                        permissionMapper.updateById(permissionTmp);
                    }
                } catch (Exception e) {
                    e.printStackTrace();
                }
            }
        }
    }


    //获取t_permission表中的url  //@RequestMapping("/department") //@GetMapping("/{id}")
    private String getUri(Class clazz, Method method) {
        //获取类上的请求路径:/department
        String classPath = "";
        // 获取当前类的@RequestMapping注解
        Annotation annotation = clazz.getAnnotation(RequestMapping.class);
        // 判断注解是否存在
        if (annotation != null) {
            // 类型强转
            RequestMapping requestMapping = (RequestMapping) annotation;
            // 获取@RequestMapping注解的数组值
            String[] values = requestMapping.value();
            // 判断值是否为空
            if (values != null && values.length > 0) {
                // 将请求路径赋值给classPath
                classPath = values[0];
                if (!"".equals(classPath) && !classPath.startsWith("/"))
                    classPath = "/" + classPath;
            }
        }
        //以下是获取方法上的请求路径:/{id}
        GetMapping getMapping = method.getAnnotation(GetMapping.class);
        // 方法上的请求路径
        String methodPath = "";
        if (getMapping != null) {
            // 获取注解上的值
            String[] values = getMapping.value();
            if (values != null && values.length > 0) {
                methodPath = values[0];
                if (!"".equals(methodPath) && !methodPath.startsWith("/"))
                    methodPath = "/" + methodPath;
            }
        }

        PostMapping postMapping = method.getAnnotation(PostMapping.class);
        if (postMapping != null) {
            String[] values = postMapping.value();
            if (values != null && values.length > 0) {
                methodPath = values[0];
                if (!"".equals(methodPath) && !methodPath.startsWith("/"))
                    methodPath = "/" + methodPath;
            }
        }

        DeleteMapping deleteMapping = method.getAnnotation(DeleteMapping.class);
        if (deleteMapping != null) {
            String[] values = deleteMapping.value();
            if (values != null && values.length > 0) {
                methodPath = values[0];
                if (!"".equals(methodPath) && !methodPath.startsWith("/"))
                    methodPath = "/" + methodPath;
            }
        }

        PutMapping putMapping = method.getAnnotation(PutMapping.class);
        if (putMapping != null) {
            String[] values = putMapping.value();
            if (values != null && values.length > 0) {
                methodPath = values[0];
                if (!"".equals(methodPath) && !methodPath.startsWith("/"))
                    methodPath = "/" + methodPath;
            }

        }

        PatchMapping patchMapping = method.getAnnotation(PatchMapping.class);
        if (patchMapping != null) {
            String[] values = patchMapping.value();
            if (values != null && values.length > 0) {
                methodPath = values[0];
                if (!"".equals(methodPath) && !methodPath.startsWith("/"))
                    methodPath = "/" + methodPath;
            }
        }

        RequestMapping requestMapping = method.getAnnotation(RequestMapping.class);
        if (requestMapping != null) {
            String[] values = requestMapping.value();
            if (values != null && values.length > 0) {
                methodPath = values[0];
                if (!"".equals(methodPath) && !methodPath.startsWith("/"))
                    methodPath = "/" + methodPath;
            }
        }
        return classPath + methodPath;  // /department/{id}
    }

    private String getPermissionSn(String value) {
        String regex = "\\[(.*?)]";
        Pattern p = Pattern.compile("(?<=\\()[^\\)]+");
        Matcher m = p.matcher(value);
        String permissionSn = null;
        if (m.find()) {
            permissionSn = m.group(0).substring(1, m.group().length() - 1);
        }
        return permissionSn;
    }
}
8. 工具类:ClassUtils.java
package io.coderyeah.basic.util;

import java.io.File;
import java.io.FileFilter;
import java.io.IOException;
import java.net.URL;
import java.net.URLDecoder;
import java.util.Enumeration;
import java.util.LinkedHashSet;
import java.util.Set;

public class ClassUtils {
    /**
     * 从传入的包中获取所有的类的字节码对象:
     *
     * @author LEIYU
     * @param pack
     * @return
     */
    public static Set<Class<?>> getClasses(String pack) {

        // 第一个class类的集合
        Set<Class<?>> classes = new LinkedHashSet<Class<?>>();
        // 是否循环迭代
        boolean recursive = true;
        // 获取包的名字 并进行替换
        String packageName = pack;
        String packageDirName = packageName.replace('.', '/');
        // 定义一个枚举的集合 并进行循环来处理这个目录下的things
        Enumeration<URL> dirs;
        try {
            dirs = Thread.currentThread().getContextClassLoader().getResources(packageDirName);
            // 循环迭代下去
            while (dirs.hasMoreElements()) {
                // 获取下一个元素
                URL url = dirs.nextElement();
                // 得到协议的名称
                String protocol = url.getProtocol();
                // 如果是以文件的形式保存在服务器上
                if ("file".equals(protocol)) {
                    // 获取包的物理路径
                    String filePath = URLDecoder.decode(url.getFile(), "UTF-8");
                    // 以文件的方式扫描整个包下的文件 并添加到集合中
                    findAndAddClassesInPackageByFile(packageName, filePath, recursive, classes);
                }
            }
        } catch (IOException e) {
            e.printStackTrace();
        }

        return classes;
    }

    // 2.以文件的形式来获取包下的所有Class

    /**
     * 以文件的形式来获取包下的所有Class
     *
     * @param packageName
     * @param packagePath
     * @param recursive
     * @param classes
     */
    public static void findAndAddClassesInPackageByFile(String packageName, String packagePath, final boolean recursive,
            Set<Class<?>> classes) {
        // 获取此包的目录 建立一个File
        File dir = new File(packagePath);
        // 如果不存在或者 也不是目录就直接返回
        if (!dir.exists() || !dir.isDirectory()) {
            // log.warn("用户定义包名 " + packageName + " 下没有任何文件");
            return;
        }
        // 如果存在 就获取包下的所有文件 包括目录
        File[] dirfiles = dir.listFiles(new FileFilter() {
            // 自定义过滤规则 如果可以循环(包含子目录) 或则是以.class结尾的文件(编译好的java类文件)
            public boolean accept(File file) {
                return (recursive && file.isDirectory()) || (file.getName().endsWith(".class"));
            }
        });
        // 循环所有文件
        for (File file : dirfiles) {
            // 如果是目录 则继续扫描
            if (file.isDirectory()) {
                findAndAddClassesInPackageByFile(packageName + "." + file.getName(), file.getAbsolutePath(), recursive,
                        classes);
            } else {
                // 如果是java类文件 去掉后面的.class 只留下类名
                String className = file.getName().substring(0, file.getName().length() - 6);
                try {
                    // 添加到集合中去
                    // classes.add(Class.forName(packageName + '.' +
                    // className));
                    // 经过回复同学的提醒,这里用forName有一些不好,会触发static方法,没有使用classLoader的load干净
                    classes.add(
                            Thread.currentThread().getContextClassLoader().loadClass(packageName + '.' + className));
                } catch (ClassNotFoundException e) {
                    // log.error("添加用户自定义视图类错误 找不到此类的.class文件");
                    e.printStackTrace();
                }
            }
        }
    }

}
Vue的拦截器和第三方微信登录的使用总结
一. axios拦截器
1. axios携带token
//main.js
//======================axios的前置拦截器【拦截调用后端的请求====================//
axios.interceptors.request.use(res=>{
  let token = localStorage.getItem("token");
  if(token){
    res.headers["token"] = token;
  }
  return res;
},error => {
  Promise.reject(error)
})
//======================axios的前置拦截器【拦截调用后端的请求】====================//
2. 后端拦截器
@Component
public class LoginInterceptor implements HandlerInterceptor {
    @Autowired
    private StringRedisTemplate stringRedisTemplate;

    @Override
    public boolean preHandle(HttpServletRequest req, HttpServletResponse resp, Object handler) throws Exception {
        //1.获取token
        String token = req.getHeader("token");
        //3.如果有token,通过token获取redis的登录信息
        if (token != null) {
            String loginInfo = stringRedisTemplate.opsForValue().get(Constants.LOGIN_TOKEN + token); // LoginInfo对象
            if (loginInfo != null) {//登录成功,而且没有过期
                //5.如果登录信息不为null - 放行 + 刷新过期时间[重新添加到redis]
                stringRedisTemplate.opsForValue().set(token, loginInfo, 30, TimeUnit.MINUTES);
                return true;
            }
        }
        //2.判断token,如果为null - 直接拦截 响应前端 - 跳转到登录页面
        //4.如果登录信息为null - 过期了 直接拦截 响应前端 - 跳转到登录页面

        //跳转到登录页面 - 后端跳不了,因为后端项目没有页面 - 放在前端跳转
        //告诉浏览器我要给你响应一个json数据,编码集为utf-8
        resp.setContentType("application/json;charset=UTF-8");
        resp.getWriter().println("{\"success\":false,\"message\":\"noLogin\"}");
        return false;
    }
 }
3. 处理拦截器响应
//main.js
//======================axios的后置拦截器【处理后台登录拦截的结果】====================//
axios.interceptors.response.use(res => {
    //后端响应的是没有登录的信息
    if (false === res.data.success && "noLogin" === res.data.message) {
        localStorage.removeItem("token");
        localStorage.removeItem("logininfo");
        router.push({path: '/login'});
      }
      return res;
},error => {
      Promise.reject(error)
})
//======================axios的后置拦截器【处理后台登录拦截的结果】====================//
4. 路由拦截器
//======================路由的前端拦截器【拦截不到后端的请求】====================//
//注释掉登陆拦截:判断session中有没有user对象并且路径不是login就调转到登录页面
router.beforeEach((to, from, next) => {
    if (to.path == '/login' || to.path == "/register") {
        next();//放行
      }else{
        let logininfo = localStorage.getItem('logininfo');
        if (logininfo) {
              next();
        } else {
              next({path: '/login'});//跳转到login
        }
      }
})
5. 前端登录代码
    handleSubmit2(ev) {
      //表单校验:所有表单项校验成功才返回为true - 才能发送请求
      this.$refs.ruleForm2.validate((valid) => {
        if (valid) {
          this.logining = true; //显示加载框或忙等框
          this.$http.post("/login/account", this.ruleForm2).then(res => {
            if (res.data.success) {//登录成功
              //1.显示成功信息
              this.$message({
                message: "登录成功",
                type: 'success'
              });
              let {token, loginInfo} = res.data.data
              localStorage.setItem("token", token)
              localStorage.setItem("logininfo", JSON.stringify(logininfo))
              console.log(res.data);
              //跳转到后台首页
              this.$router.push({path: '/echarts'});
            } else {//登录失败
              this.$message.error(res.data.msg);
            }
            this.logining = false; //关闭加载框或忙等框
          }).catch(res => {
            this.$message.error("系统繁忙,请稍后重试!!!【400,404】")
            this.logining = false; //关闭加载框或忙等框
          })
        } else {
          console.log('表单校验失败!!!');
          return false;
        }
      });
    }
二. 第三方登录概述
1. 什么是第三方登录
三方登录指的是基于用户在主流平台【微信,支付宝,QQ】上已有的账号来快速完成己方应用的登录或者注册的功能。而这里的主流平台,一般是已经拥有大量用户的平台,国外的比如Facebook,Twitter等,国内的比如微博、微信、QQ等。 第三方登录的目的是使用用户在其他平台上频繁使用的账号,来快速登内录己方产品,也可以实现不注册就能登录,好处就是登录比较快捷,无需注册。
2. 优缺点
- 优点:这些系统有很大的用户群体,可以扩大客户群,引流。不需要记录账号密码,不担心忘记,直接扫描登录,体验度高。简单快捷,无需注册就可以直接登录
- 缺点:要交钱【网站运营商向微信运营商缴费】
三. 三方登录协议
1. OAuth2.0
OAuth协议为用户资源的授权提供了一个安全的、开放而又简易的标准。与以往的授权方式不同之处是OAUTH的授权不会使第三方触及到用户的帐号信息(如用户名与密码),即第三方无需使用用户的用户名与密码就可以申请获得该用户资源的授权,因此OAuth是安全的。OAuth是Open Authorization的简写,目前的版本是2.0版.
例如:使用微信登录,并不会获取到微信的账号密码,只需要同意授权即可。如果我们的项目被攻破了,那就知道了用户的微信账号,然后用户的微信就危险了。小平台或小公司的系统很容易被攻击甚至被攻破
2. 运行流程
- 获取用户授权
- 得到用户授权获取令牌
- 使用令牌访问受限资源
(A)用户打开客户端以后,客户端要求用户给予授权。
(B)用户同意给予客户端授权。
(C)客户端使用上一步获得的授权,向认证服务器申请令牌。
(D)认证服务器对客户端进行认证以后,确认无误,同意发放令牌。
(E)客户端使用令牌,向资源服务器申请获取资源。
(F)资源服务器确认令牌无误,同意向客户端开放资源。
上述六个步骤中,B是关键,即用户怎样才能给客户端授权。有了这个授权以后,客户端就可以获取令牌,进而凭借令牌获取资源
四. 微信登录概述
- 开发网址:https://open.weixin.qq.com/
- 自己的网站可以接入网站应用开发,为用户提供了微信登录功能,降低了注册门槛,并可在用户授权后,获取用户基本信息,包括头像、昵称、性别、地区。出于安全考虑,网站应用的微信登录,需通过微信扫描二维码来实现
- 注册账号:要想接入微信的登录功能,首先需要在微信开发平台进行用户的注册,同时需要认证为开发者,再创建网站应用,等待微信审批,审批过后,就可以使用相关功能
- 开发者认证:认证一次300人民币。 以后要做第三方登录
- 微信登陆功能官网教程网址:https://developers.weixin.qq.com/doc/oplatform/Website_App/WeChat_Login/Wechat_Login.html
五. 微信登录实现
1. 三个请求
- 微信登录一共发送三个请求:
- 授权请求 - a标签链接过去就OK,获取code
- 使用授权码code和appid和SECRET获取令牌token,返回token和openid - 后端使用Httpclient发送请求
- 如果微信用户没有绑定三方程序user,需要发送请求获取微信用户信息:token和openid
2. 配置回调域名
问:当扫码成功之后要跳转到哪个页面呢?
即使你在当前项目中定义一个页面,外网微信开发平台无法访问本地应用127.0.0.1
如果上线了:配置真实域名,但是测试阶段使用本地域名
3. 配置本地域名(注:域名换成自己购买的域名)
文件位置:C:\Windows\System32\drivers\etc\hosts
Host文件配置:127.0.0.1 bugtracker.itsource.cn
注意:bugtracker.itsource.cn是真实有效的
六. 微信授权流程
1.用户点击微信登录,发送第一个请求,弹出二维码,请求地址:
https://open.weixin.qq.com/connect/qrconnect?appid=wxd853562a0548a7d0&redirect_uri=http://bugtracker.itsource.cn/callback.html&response_type=code&scope=snsapi_login&state=1#wechat_redirect
2.用户使用手机扫码之后,点击同意授权,返回回调地址和code
回调地址:上一步redirect_uri设置的地址,该地址必须是一个可以访问的域名地址,localhost不行。
可以使用bugtracker.itsource.cn做测试
code:授权码
3.配置回调域名:hosts文件
准备callback.html回调页面,一个空页面,仅仅用来处理数据,并发送微信登录请求
注意:前端拦截器已经拦截了callback.html,而且bugtracker.itsource.cn域名要访问后端服务器要配置跨域
callback.html
<!DOCTYPE html>
<html lang="en">
<head>
    <meta charset="UTF-8">
    <title>回调</title>

    <!--引入vue + axios-->
    <script src="js/plugins/vue/dist/vue.js"></script>
    <script src="js/plugins/axios/dist/axios.js"></script>
    <!--全局使用axios-->
    <script src="js/common.js"></script>
</head>
<body>
<div id="myDiv">

</div>
<script type="text/javascript">
    new Vue({
        el: "#myDiv",
        mounted() {
            //解析参数对象
            //http://bugtracker.itsource.cn/callback.html?code=031QtAll2kBeA64RzJol2gpcaW3QtAlk&state=1
            let url = location.href;
            // alert(url)
            let paramObj = parseUrlParams2Obj(url);

            //获取发送请求参数
            let params = {"code": paramObj.code};
            let code = paramObj.code
            //发起微信登录请求  调用微信登录接口
            this.$http.get("/login/wechat/" + code)
                .then(result => {
                    result = result.data;
                    console.log(result);
                    if (result.success) { //已经关联了 免密登录之后,需要调到主页
                        //做登录
                        //提示
                        alert("登录成功!")
                        //1.保存返回的token,logininfo到localStorage
                        let {token, loginInfo} = result.data;
                        localStorage.setItem("token", token);
                        localStorage.setItem("loginInfo", JSON.stringify(loginInfo));
                        //2.跳转到首页,显示当前登录人
                        location.href = "index.html";
                    } else { //没有关联跳转绑定页面   "?accessToken="+accessToken+"&openId="+openId;
                        let binderUrl = "http://bugtracker.itsource.cn/binder.html" + "?accessToken=" + result.data.accessToken + "&openId=" + result.data.openId;
                        location.href = binderUrl;
                    }
                })
                .catch(result => {
                    alert("系统错误");
                    console.log(result);
                })
        }
    });
</script>
</body>
</html>
common.js的全局配置文件
// axios基础路径
axios.defaults.baseURL = 'http://localhost:8080';
// axios的全局属性
Vue.prototype.$http = axios

//======================axios的前置拦截器【拦截调用后端的请求====================//
axios.interceptors.request.use(res => {
    let token = localStorage.getItem("token");
    if (token) {
        res.headers["token"] = token;
    }
    return res;
}, error => {
    Promise.reject(error)
})
//======================axios的前置拦截器【拦截调用后端的请求】====================//


//======================axios的后置拦截器【处理后台登录拦截的结果】====================//
axios.interceptors.response.use(res => {
    //后端响应的是没有登录的信息
    if (false === res.data.success && "noLogin" === res.data.message) {
        localStorage.removeItem("token");
        localStorage.removeItem("loginInfo");
        location.href = 'login.html'
    }
    return res;
}, error => {
    Promise.reject(error)
})
//======================axios的后置拦截器【处理后台登录拦截的结果】====================//


//======================路由的前端拦截器【拦截不到后端的请求】====================//
let url = location.href;//获取地址栏请求地址
// alert(url)
// 访问的不是login.html和register.html
if (url.indexOf('login.html') == -1 && url.indexOf('register.html') == -1
    && url.indexOf('binder.html') == -1 && url.indexOf('callback.html') == -1) {
    let logininfo = localStorage.getItem("loginInfo")
    if (!logininfo) {//没有登录
        location.href = 'login.html'
    }
}

//封装公用方法 - 将字符串的参数解析为json对象
function parseUrlParams2Obj(url) {//xxx?code=xxx&state=1
    let paramStr = url.substring(url.indexOf("?") + 1);//code=xxx&state=1
    let paramArr = paramStr.split("&");//[code=xxx,state=1]
    let paramObj = {};
    for (let i = 0; i < paramArr.length; i++) {
        let paramTemp = paramArr[i];//code=xxx
        let paramName = paramTemp.split("=")[0];//code
        let paramValue = paramTemp.split("=")[1];//xxx
        paramObj[paramName] = paramValue;//{code:xxx,state:1}
    }
    return paramObj;
}
七. 微信登录流程
1.在callback.html页面中解析地址栏中的code,并发送微信异步登录请求,传递code
2.后端处理微信登录请求,service业务中
  2.1.获得授权码code,和appid,SECRET一起发送获取access_token的请求
请求地址2:https://api.weixin.qq.com/sns/oauth2/access_token?appid=APPID&secret=SECRET&code=CODE&grant_type=authorization_code
  2.2:建议配置常量比较方便些,也比较好维护
  2.3:返回值是一个json字符串【参考官网】,想办法将其转成json对象,才能获取里面的数据【fastJsoon】
                {
                    "access_token":"ACCESS_TOKEN",
                    "expires_in":7200,
                    "refresh_token":"REFRESH_TOKEN",
                    "openid":"OPENID",
                    "scope":"SCOPE",
                    "unionid": "o6_bmasdasdsad6_2sgVt7hMZOPfL"
                }
3.根据openid去查询微信用户信息
    a.如果有并且和user绑定了【有user_id】,说明绑定过,直接获取Logininfo对象实现免密登录
        解释1:如果没有wxuser,说明第一次登录
        解释2:如果用户以前登录过,后面注销了user信息,wxuser就关联不上了,获取级联清空了wxuser中的user_id
        疑问:为啥要将wxuser与user绑定:以后不管是微信登录还是账号登录都是同一个账户,都是自己的信息
            return true;//登录成功
    b.如果没有wxuser信息并且也没有和user_id绑定
                就通过Result将access_token和openid响应给前端,发送微信用户绑定请求
                return false;//登录失败,第一次登录需要手机验证码
    请求地址3:https://api.weixin.qq.com/sns/userinfo?access_token=ACCESS_TOKEN&openid=OPENID
    测试:注意,微信只能扫一次,第二次扫的时候accessToken为null
7.1 微信登录常量
//微信登录相关常量
public interface WxConstants {
    String APPID = "wxd853562a0548a7d0";
    String GET_ACK_URL = "https://api.weixin.qq.com/sns/oauth2/access_token?appid=APPID&secret=SECRET&code=CODE&grant_type=authorization_code";
    String SECRET = "4a5d5615f93f24bdba2ba8534642dbb6";
    String GET_USER_URL = "https://api.weixin.qq.com/sns/userinfo?access_token=ACCESS_TOKEN&openid=OPENID";
}
7.2 微信登录业务代码
    @Override
    public Result wechatLogin(String code) {
        /*
        http请求方式: GET
https://api.weixin.qq.com/sns/oauth2/access_token?appid=APPID&secret=SECRET&code=CODE&grant_type=authorization_code
         */
        //发送第二次请求 准备参数
        final String url = WxConstants.GET_ACK_URL.replace("APPID", WxConstants.APPID)
                .replace("SECRET", WxConstants.SECRET).replace("CODE", code);
        //发送get请求返回json字符串 返回的结果如下
        /*{
        "access_token":"ACCESS_TOKEN",
        "expires_in":7200,
        "refresh_token":"REFRESH_TOKEN",
        "openid":"OPENID",
        "scope":"SCOPE"
        }*/
        final String jsonStr = HttpUtil.httpGet(url);
        //转换json对象
        final JSONObject jsonObject = JSONObject.parseObject(jsonStr);
        final String access_token = jsonObject.getString("access_token");
        final String openid = jsonObject.getString("openid");
        //通过openid去t_wxuser中查询
        final WxUser wxUser = wxUserMapper.selectOne(new LambdaQueryWrapper<WxUser>().eq(WxUser::getOpenid, openid));
        if (wxUser != null) {//微信已经与账号关联 直接跳转不需要密码登录
            //查找user表的关联信息
            final User user = userMapper.selectById(wxUser.getUserId());
            if (user != null) {
                //查找登录信息
                final LoginInfo loginInfo = loginInfoMapper.selectById(user.getLogininfoId());
                //生成token
                final String token = UUID.randomUUID().toString();
                // 保存信息进入redis
                stringRedisTemplate.opsForValue().set(Constants.LOGIN_TOKEN + token, JSON.toJSONString(loginInfo), 30, TimeUnit.MINUTES);
                //封装返回登录的信息
                Map<String, Object> map = new HashMap<>();
                map.put("token", token);
                map.put("loginInfo", loginInfo);
                return Result.success(map);
            } else {
                return Result.fail("用户未注册");
            }
        } else {
            // 跳转微信绑定界面 "?accessToken="+accessToken+"&openId="+openId
            //5.没有 - 需要跳转页面绑定 - 响应给前端进行跳转
            Map<String, Object> map = new HashMap<>();
            map.put("accessToken", access_token);
            map.put("openId", openid);
            return Result.fail(map);
        }
    }
八. 微信绑定流程
1.callback.html发送异步请求的else中获取后端响应的access_token和openid
2.将其拼接到binder.html后跳转到binder.html页面
binder.html?accessToken=access_token&openId=openid
3.binder.html页面,输入手机号码,获取验证码
4.后端处理获取验证码请求
5.前端binder.html页面收到验证码之后,填写验证码
  5.1.页面一加载要解析url获取access_token和openid,复制给模型数据
            phoneUserForm:{
                phone:"13330964748",
                verifyCode:null,
                accessToken:null,
                openId:null
            }
6.发送绑定微信用户请求
7.后端处理微信用户绑定请求
8.后端处理微信用户绑定请求
  8.1.校验验证码和验证码过期时间
  8.2.发送第三个请求获取wxuser信息
  8.3.将wxuser信息转成WxUser对象:WxUser wxUser = wxUserStr2WxUser(wxUserStr);
  8.4.根据电话从头t_user中获取用户信息,进行判断
  8.5.如过user==null,通过手机号构建一个User对象,密码随机的6位,并同步Logininfo信息,保存到数据库
  8.6.如果user!=null,直接就用这个user对象
  8.7.将wxUser与User绑定 = wxUser的user_id关联起来
  8.8.添加用户到t_wxUser
  8.9.免密登录
8.1 发送微信绑定请求
binder() {
    this.$http.post("/login/wechat/binder", this.phoneUserForm).then(result => {
        console.log(this.phoneUserForm)
        result = result.data;
        if (result.success) {
            alert("绑定成功!")
            //1.保存返回的token,logininfo到localStorage
            let {token, loginInfo} = result.data;
            localStorage.setItem("token", token);
            localStorage.setItem("loginInfo", JSON.stringify(loginInfo));
            location.href = "/index.html"; //注册成功后跳转登录页面
        } else {
            alert(result.msg)
        }
    }).catch(result => {
        alert("系统错误!");
    })
},
8.2 binder.html页面初始化数据
mounted() {
    let paramObj = parseUrlParams2Obj(location.href);
    if (paramObj) {
        this.phoneUserForm.accessToken = paramObj.accessToken;
        this.phoneUserForm.openId = paramObj.openId;
    }
}
8.3 绑定时获取验证码
@Override
public void binderSmsCode(PhoneCodeDTO codeDTO) {
    final String phone = codeDTO.getPhone();
    if (StrUtil.isBlank(phone)) {
        throw new BusinessException("手机号码不能为空");
    }
    // 因为微信扫码登录需要关联手机号码 判断手机号是否已经绑定微信号
    final User user = userMapper.selectOne(new LambdaQueryWrapper<User>().eq(User::getPhone, phone));
    // 用户存在
    if (user != null) {
        final WxUser wxUser = wxUserMapper.selectOne(new LambdaQueryWrapper<WxUser>().eq(WxUser::getUserId, user.getId()));
        if (wxUser != null) {
            throw new BusinessException("手机号已经绑定其它微信账号,请直接登录...");
        }
    }
    final String value = stringRedisTemplate.opsForValue().get(VerifyCodeConstants.PHONE_CODE + phone);
    String code = null;
    if (value != null) {// 验证码还未过期
        //判断是否过了重发时间
        final long oldTime = Long.parseLong((value.split(":")[1]));
        if ((System.currentTimeMillis() - oldTime) <= 60) {//间隔时间未超过一分钟
            throw new BusinessException("操作频繁,请稍后再试!");
        } else {
            code = value.split(":")[0];
        }
    } else {
        // 生成验证码
        code = RandomUtil.randomNumbers(6);
    }
    stringRedisTemplate.opsForValue().set(VerifyCodeConstants.PHONE_CODE + phone, code, 3L, TimeUnit.MINUTES);
    log.info("授权短信验证码:{}", code);
}
8.4 微信绑定业务代码
 @Override
    public Result wechatBinder(BinderDTO binderDTO) {
        final String phone = binderDTO.getPhone();
        final String verifyCode = binderDTO.getVerifyCode();
        if (StrUtil.isBlank(phone) || StrUtil.isBlank(verifyCode)) {
            throw new BusinessException("数据不能为空");
        }
        final String value = stringRedisTemplate.opsForValue().get(VerifyCodeConstants.PHONE_CODE + phone);
        if (value == null) {
            throw new BusinessException("验证码已经过期!!!");
        }
        //判断验证码输入是否正确
        if (!verifyCode.equals(value.split(":")[0])) {
            throw new BusinessException("验证码错误!!!");
        }

        String url = WxConstants.GET_USER_URL.replace("ACCESS_TOKEN", binderDTO.getAccessToken())
                .replace("OPENID", binderDTO.getOpenId());
        // 发送获取微信用户信息请求
        final String jsonStr = HttpUtil.httpGet(url);
        WxUser wxUser = jsonStr2WxUser(jsonStr);
        //查询user是否存在
        User user = userMapper.selectOne(new LambdaQueryWrapper<User>().eq(User::getPhone, phone));
        if (user == null) {
            //用户不存在就注册
            user = phone2User(phone);
            // 新增登录对象
            LoginInfo loginInfo = user2LoginInfo(user);
            loginInfoMapper.insert(loginInfo);
            user.setLogininfoId(loginInfo.getId());
            userMapper.insert(user);
        }
        wxUser.setUserId(user.getId());
        wxUserMapper.insert(wxUser);
        // 免密登录
        final LoginInfo loginInfo = loginInfoMapper.selectById(user.getLogininfoId());
        loginInfo.setPassword(null);
        loginInfo.setSalt(null);
        final String token = UUID.randomUUID().toString();
        // 存入redis
        stringRedisTemplate.opsForValue().set(Constants.LOGIN_TOKEN + token, JSON.toJSONString(loginInfo), 30, TimeUnit.MINUTES);
        final HashMap<String, Object> map = new HashMap<>();
        map.put("token", token);
        map.put("loginInfo", loginInfo);
        return Result.success(map);
    }

    private LoginInfo user2LoginInfo(User user) {
        final LoginInfo loginInfo = BeanUtil.copyProperties(user, LoginInfo.class);
        loginInfo.setDisable(true);
        return loginInfo;
    }

    private User phone2User(String phone) {
        final User user = new User();
        user.setPhone(phone);
        user.setUsername(phone);
        user.setState(1);
        final String salt = RandomUtil.randomString(32);//盐值
        final String pwd = RandomUtil.randomNumbers(6);//随机密码
        user.setSalt(salt);
        user.setPassword(DigestUtil.md5Hex(salt + pwd));//密码
        return user;
    }

    private WxUser jsonStr2WxUser(String jsonStr) {
        final JSONObject res = JSON.parseObject(jsonStr);
        final WxUser wxUser = new WxUser();
        wxUser.setNickname(res.getString("nickname"));
        wxUser.setSex(res.getInteger("sex"));
        wxUser.setOpenid(res.getString("openid"));
        wxUser.setHeadimgurl(res.getString("headimgurl"));
        wxUser.setUnionid(res.getString("unionid"));
        wxUser.setAddress(res.getString("country") + res.getString("province") + res.getString("city"));
        log.info("nickname:{}", res.getString("nickname"));
        log.info("city:{}", res.getString("city"));
        log.info("province:{}", res.getString("province"));
        log.info("headimgurl:{}", res.getString("headimgurl"));
        return wxUser;
    }
九. 后端发送Http请求工具类
package io.coderyeah.basic.util;

import org.apache.commons.httpclient.HttpClient;
import org.apache.commons.httpclient.methods.GetMethod;
import org.apache.commons.httpclient.params.HttpMethodParams;

import java.io.BufferedReader;
import java.io.DataOutputStream;
import java.io.IOException;
import java.io.InputStreamReader;
import java.net.HttpURLConnection;
import java.net.URL;
import java.util.List;
import java.util.Map;

/**
 * http 工具类
 */
public class HttpUtil {

    public static String post(String requestUrl, String accessToken, String params)
            throws Exception {
        String contentType = "application/x-www-form-urlencoded";
        return HttpUtil.post(requestUrl, accessToken, contentType, params);
    }

    public static String post(String requestUrl, String accessToken, String contentType, String params)
            throws Exception {
        String encoding = "UTF-8";
        if (requestUrl.contains("nlp")) {
            encoding = "GBK";
        }
        return HttpUtil.post(requestUrl, accessToken, contentType, params, encoding);
    }

    public static String post(String requestUrl, String accessToken, String contentType, String params, String encoding)
            throws Exception {
        String url = requestUrl + "?access_token=" + accessToken;
        return HttpUtil.postGeneralUrl(url, contentType, params, encoding);
    }

    public static String postGeneralUrl(String generalUrl, String contentType, String params, String encoding)
            throws Exception {
        URL url = new URL(generalUrl);
        // 打开和URL之间的连接
        HttpURLConnection connection = (HttpURLConnection) url.openConnection();
        connection.setRequestMethod("POST");
        // 设置通用的请求属性
        connection.setRequestProperty("Content-Type", contentType);
        connection.setRequestProperty("Connection", "Keep-Alive");
        connection.setUseCaches(false);
        connection.setDoOutput(true);
        connection.setDoInput(true);

        // 得到请求的输出流对象
        DataOutputStream out = new DataOutputStream(connection.getOutputStream());
        out.write(params.getBytes(encoding));
        out.flush();
        out.close();

        // 建立实际的连接
        connection.connect();
        // 获取所有响应头字段
        Map<String, List<String>> headers = connection.getHeaderFields();
        // 遍历所有的响应头字段
        for (String key : headers.keySet()) {
            System.err.println(key + "--->" + headers.get(key));
        }
        // 定义 BufferedReader输入流来读取URL的响应
        BufferedReader in = null;
        in = new BufferedReader(
                new InputStreamReader(connection.getInputStream(), encoding));
        String result = "";
        String getLine;
        while ((getLine = in.readLine()) != null) {
            result += getLine;
        }
        in.close();
        System.err.println("result:" + result);
        return result;
    }

    public static String httpGet(String url) {
        // 1 创建发起请求客户端
        try {
            HttpClient client = new HttpClient();
            // 2 创建要发起请求-tet
            GetMethod getMethod = new GetMethod(url);
            //            getMethod.addRequestHeader("Content-Type",
            //                    "application/x-www-form-urlencoded;charset=UTF-8");
            getMethod.getParams().setParameter(HttpMethodParams.HTTP_CONTENT_CHARSET, "utf8");
            // 3 通过客户端传入请求就可以发起请求,获取响应对象
            client.executeMethod(getMethod);
            // 4 提取响应json字符串返回
            String result = new String(getMethod.getResponseBodyAsString().getBytes("utf8"));
            return result;
        } catch (IOException e) {
            e.printStackTrace();
        }
        return null;
    }
}
如何使用短信验证码完成注册功能
一. MD5加密工具类
import java.security.MessageDigest;
import java.security.NoSuchAlgorithmException;

/**
 * 密码加密工具
 */
public class Md5Utils {

    /**
     * 加密
     * @param context
     */
    public static String encrypByMd5(String context) {
        try {
            MessageDigest md = MessageDigest.getInstance("MD5");
            md.update(context.getBytes());//update处理
            byte [] encryContext = md.digest();//调用该方法完成计算

            int i;
            StringBuffer buf = new StringBuffer("");
            for (int offset = 0; offset < encryContext.length; offset++) {//做相应的转化(十六进制)
                i = encryContext[offset];
                if (i < 0) i += 256;
                if (i < 16) buf.append("0");
                buf.append(Integer.toHexString(i));
            }
            return buf.toString();
        } catch (NoSuchAlgorithmException e) {
            // TODO Auto-generated catch block
            e.printStackTrace();
            return  null;
        }
    }
  }
二. 短信服务
短信验证,只有三大运营商具有短信发送的能力。要发送短信只有找三大运营,或者中间商。简单说就是要找第三方的短信平台。常见的有阿里云,京东智联云,乐讯通等等非常多。举例使用网建短信通:http://www.smschinese.cn/
操作流程
点击左上角首页 -> API接口 -> 网建SMS短信通API接口地址 -> UTF-8编码发送短信接口:
http://utf8.api.smschinese.cn/?Uid=本站用户名&Key=接口短信密钥&smsMob=手机号码&smsText=验证码:8888
    本站用户名Uid:注册时用户名
    接口安全密钥key:刚刚看到的密钥
    手机号码smsMob:手机号码
    短信内容smsText:随便写
api接口中有发送短信的各个对应状态:发送了一条,就只剩下4条了
导入依赖
      <!-- 主要用于后端发送http请求-->
        <!-- 后端发送http请求 - 一般用在调用三方接口时会用 -->
        <dependency>
            <groupId>commons-httpclient</groupId>
            <artifactId>commons-httpclient</artifactId>
            <version>3.1</version>
        </dependency>
发送短信工具类(官网也有相应代码可参考)
package io.coderyeah.basic.util;

import org.apache.commons.httpclient.HttpClient;
import org.apache.commons.httpclient.NameValuePair;
import org.apache.commons.httpclient.methods.PostMethod;

/**
 * 短信发送工具类
 */
public class SmsUtils {

    //用户名
    public static final String UID = "codermyth";
    //秘钥
    public static final String KEY = "29766C0677741B5DA2CE2203260365DB";

    /**
     * 发送短信
     *
     * @param phones  手机们 a,b
     * @param content 发送内容
     * @return 返回值
     */
    public static String sendSms(String phones, String content) {
        PostMethod post = null;
        try {
            HttpClient client = new HttpClient();
            post = new PostMethod("http://utf8.api.smschinese.cn");
            post.addRequestHeader("Content-Type", "application/x-www-form-urlencoded;charset=utf8");//在头文件中设置转码
            NameValuePair[] data = {new NameValuePair("Uid", SmsUtils.UID),
                    new NameValuePair("Key", SmsUtils.KEY),
                    new NameValuePair("smsMob", phones),
                    new NameValuePair("smsText", content)};
            post.setRequestBody(data);

            client.executeMethod(post);
            int statusCode = post.getStatusCode();
            System.out.println("statusCode:" + statusCode); //200 404 400
            String result = new String(post.getResponseBodyAsString().getBytes("utf8"));
            return result;

        } catch (Exception e) {
            e.printStackTrace();
        } finally {
            if (post != null) {
                post.releaseConnection();
            }
        }
        return null;
    }

    public static void main(String[] args) {
        System.out.println(SmsUtils.sendSms("18365403510", "您的验证码为:【8848】,鉴于您优秀的能力表现,您被授予玛丽叶奥特曼称号,accept it, cutie!"));
    }
}
三. 前端获取验证码接口
 <div class="verification">
     <label for="code"><i class="am-icon-code-fork"></i></label>
          <input type="tel" name="" id="code" v-model="phoneUserForm.phoneCode"  placeholder="请输入验证码">
               <button type="button" id="dyMobileButton" @click="sendMobileCode">获取验证码</button>
 </div>
获取短信验证码
// 发送验证码
sendMobileCode() {
    //1.判断手机号不为空
    if (!this.phoneUserForm.phone) {
        alert("手机号不能为空");
        return;
    }
    //2.判断图片验证码不为空
    if (!this.phoneUserForm.imageCode) {
        alert("图片验证码不能为空");
        return;
    }
    //3.获取按钮,禁用按钮  发送时灰化不能使用,发送成功倒计时60才能使用,如果发送失败立即可以发送
    let sendBtn = $(event.target);
    sendBtn.attr("disabled", true);

    let param = {
        phone: this.phoneUserForm.phone,
        imageCode: this.phoneUserForm.imageCode,
        imageCodeKey: localStorage.getItem("verifyCodeKey")
    };

    //4.发送ajax请求
    this.$http.post("/verifyCode/smsCode", param).then(res => {
        const ajaxResult = res.data;
        if (ajaxResult.success) {
            alert("手机验证码已经发送到您的手机,请在3分钟内使用");
            //4.1.发送成:倒计时
            let time = 60;
            let interval = window.setInterval(function () {
                //每一条倒计时减一
                time = time - 1;
                //把倒计时时间搞到按钮上
                sendBtn.html(time + 's');
                //4.2.倒计时完成恢复按钮
                if (time <= 0) {
                    sendBtn.html("重新发送");
                    sendBtn.attr("disabled", false);
                    //清除定时器
                    window.clearInterval(interval);
                }
            }, 1000);
        } else {
            //4.3.发送失败:提示,恢复按钮
            sendBtn.attr("disabled", false);
            alert(ajaxResult.msg);
        }
    })
}
发送请求
//手机注册功能
            phoneRegister() {
                if (!this.agree) {
                    alert('请勾选服务协议')
                    return;
                }
                //前台一般做校验:空校验,格式校验,重复密码校验
                this.$http.post('/user/register/phone', this.phoneUserForm).then(res => {
                    //注册成功跳转到登录页面
                    if (res.data.success) {
                        location.href = "login.html";
                    } else {
                        alert(res.data.msg);
                    }
                }).catch(res => {
                    alert("系统错误!")
                });
            },
四. 后端实现获取短信接口
 @PostMapping("/smsCode")
    @ApiOperation("获取短信验证码")
    public Result getPhoneCode(@RequestBody PhoneCodeDTO phoneCodeDTO) {
        try {
            return verifyCodeService.getPhoneCode(phoneCodeDTO);
        } catch (BusinessException e) {
            e.printStackTrace();
            return Result.fail(e.getMessage());
        } catch (Exception e) {
            return Result.fail("系统异常,请稍后重试!");
        }
    }
 @Override
    public Result getPhoneCode(PhoneCodeDTO phoneCodeDTO) {
        final String phone = phoneCodeDTO.getPhone();
        final String InputImageCode = phoneCodeDTO.getImageCode();
        final String imageCodeKey = phoneCodeDTO.getImageCodeKey();
        // 1.判断参数是否为空
        if (StrUtil.isBlank(phone)) {
            // 抛出异常
            throw new BusinessException("电话号码不能为空");
        }
        if (StrUtil.isBlank(InputImageCode)) {
            // 抛出异常
            throw new BusinessException("图形验证码不能为空不能为空");
        }
        // 2.判断图形验证码是否过期 正确
        final String imageCode = stringRedisTemplate.opsForValue().get("cache:code:image:" + imageCodeKey);
        if (StrUtil.isBlank(imageCode)) {
            // 过期了
            throw new BusinessException("图形验证码已过期,请重新输入!");
        }
        // 判断是否一致 忽略大小写
        if (!InputImageCode.equalsIgnoreCase(imageCode)) {
            throw new BusinessException("图片验证码错误,请重新输入!");
        }
        // 3. 通过号码判断用户是否已经注册
        final User user = userMapper.selectOne(new LambdaQueryWrapper<User>().eq(User::getPhone, phone));
        if (user != null) {
            // 用户已经存在
            throw new BusinessException("该手机号码已被注册过,请您直接登录...");
        }
        // 4.从redis获取短信验证码
        // 用来存储短信验证码  redis中存储的值是 【短信验证码:时间戳】
        String code = null;
        final String value = stringRedisTemplate.opsForValue().get(Constants.USER_REGISTER_PHONE_PREFIX + phone);
        if (value != null) { // 没有过期
            // 判断时间是否过期
            final long oldTime = Long.parseLong(value.split(":")[1]);
            // 一分钟之内不允许频繁操作
            if ((System.currentTimeMillis() - oldTime) <= 1000 * 60) {// 没过重发时间
                throw new BusinessException("操作频繁,请稍后再试!");
            } else {
                code = value.split(":")[0];
            }
        } else {// 过期了
            // 生成验证码
            code = String.valueOf(RandomUtil.randomNumbers(6));
        }
        // 存入redis 有效期3分钟
        stringRedisTemplate.opsForValue().set("user:register:" + phone, code + ":" + System.currentTimeMillis(), 3L, TimeUnit.MINUTES);
        // 发送验证码短信
//        SmsUtils.sendSms(phone, "您的验证码是" + code + ",请及时使用有限期为3分钟");
        log.info("=========您的验证码是:{}=========", code);
        return Result.success("获取验证码成功【" + code + "】");
    }
图形验证码的使用
一. 关于js的启动服务
传统导入js开发的模式没法直接服务器方式调试,需要安装live-server服务器,这个服务器就是node一个模块
安装:npm install -g live-server
# 指定端口80
启动项目:live-server --port=80
注意:live-server服务器自带热刷新
二. 使用图形验证码
1. 前端代码
<div class="user-phone">
    <label for="imageCode"><i class="am-icon-check am-icon-sm"></i></label>
    <input type="text" name="" style="width: 180px;" v-model="phoneUserForm.imageCode" id="imageCode" placeholder="请输入图片验证码">
    <img id="captcha-image-temp" @click="getImageCode":src="base64ImageCode"  class="captcha-image-temp"  alt="点击换图" title="点击换图" style="vertical-align: middle; cursor: pointer;">
</div>
2. 流程分析
1. 前端页面一加载或点击重新获取使用axios发送异步请求获取验证码
2. 后端生成图形验证码,并将验证码保存在redis
3. 后端使用Base64将图片编码成字符串,响应给前端
4. 前端使用vue指令base64编码之后的字符串放在对应位置,最终显示图片
    <img src="这里"/>
5. 在点击获取手机验证码的时候验证图形验证码是否正确
    防止非法人员通过脚本恶意点击获取手机验证码

后端redis怎么保存图形验证码?
    1. 设置过期时间 - 简单
    2. key:UUID - 需要在前后端之间进行传输。浏览器的localStorage保存
       value:验证码
1. 请求图片验证码之前判断localStorage是否有KEY,如果没就创建,然后保存到localStorage,如果有自己直接作为参数发送Ajax请求获取图片验证码
2. 前端通过ajax发送一个图片验证码请求,携带者KEY
3. 后端收到请求,生成验证码的值
4. 把验证码的存储到Redis,以前段传入的key作为Redis的key
5. 把验证码合并到一个图片中
6. 把图片基于Base64编码层字符串,响应给前端
7. 前端拿到base64字符串,进行图片的展示,用户输入图片验证码

校验过程:前台提交注册请求 ,验证图片验证码(key也要携带),后端把前端传入的图片验证码的值和Redis中的图片验证码的值做比较
3. 前端存储数据
**sessionStorage**:存放的数据只在当前窗口有效。基本不用。不可以跨窗口;
**localStorage**:持久化存储。只要不删除,在当前浏览器永远有效。可以跨窗口,不能跨浏览器。但是不同的域名共享数据的,即在后台系统保存在localStorage的数据在前台系统是获取不到的。
4. 前端功能代码
<script>
    new Vue({
        el: '#app',
        data: {
            base64ImageCode: '', //获取图形验证码响应一个base64位的字符串
            base64ImageCodePrefix: 'data:image/jpeg;base64,',
            phoneUserForm: {
                imageCode: ''
            },
        },
        methods: {
            //生成随机图形验证码的key
            createUUID() {
                let s = [];
                let hexDigits = "0123456789abcdefghi";
                for (let i = 0; i < 36; i++) {
                    s[i] = hexDigits.substr(Math.floor(Math.random() * 0x10), 1);
                }
                s[14] = "4"; // bits 12-15 of the time_hi_and_version field to 0010
                s[19] = hexDigits.substr((s[19] & 0x3) | 0x8, 1); // bits 6-7 of the clock_seq_hi_and_reserved to 01
                s[8] = s[13] = s[18] = s[23] = "-";
                let uuid = s.join("");
                return uuid;
            },
            // 获取图形验证码
            getImageCode() {
                //获取localhost的键值 verifyCodeKey
                let key = localStorage.getItem('verifyCodeKey')
                if (!key) {// 如果key不存在就重新生成存储到本地
                    key = this.createUUID();
                    localStorage.setItem('verifyCodeKey', key)
                }
                //发送异步请求获取base64编码
                this.$http.get('/verifyCode/image/' + key).then((res) => {
                    // 在回调函数获取响应的数据与拼接前缀 绑定到src
                    this.base64ImageCode = this.base64ImageCodePrefix + res.data.msg
                }).catch(() => {
                    alert('服务器繁忙,请稍后再试!!!')
                })
            }
        },
        mounted() {
            this.getImageCode();
        }
    })
</script>
5. 后端业务实现
@Service
public class VerifyCodeServiceImpl implements VerifyCodeService {
    @Autowired
    private StringRedisTemplate stringRedisTemplate;

    @Override
    public Result getImgCode(String key) {
        // 获取随机验证码长度为4
        final String code = VerifyCodeUtils.generateVerifyCode(4);
        // 将验证码的值存入redis中 有效期五分钟
        stringRedisTemplate.opsForValue().set("cache:code:image:" + key, code, 5L, TimeUnit.MINUTES);
        // 把验证码的值合并到图片,设置宽度和高度 使用Base64编码。并返回base64编码的字符串
        return Result.success(VerifyCodeUtils.verifyCode(115, 40, code));
    }
}
6. 生成图形验证码工具类
①VerifyCodeUtils
package io.coderyeah.basic.util;

import io.coderyeah.basic.exception.BusinessException;
import sun.misc.BASE64Encoder;

import javax.imageio.ImageIO;
import java.awt.*;
import java.awt.geom.AffineTransform;
import java.awt.image.BufferedImage;
import java.io.ByteArrayOutputStream;
import java.io.IOException;
import java.io.OutputStream;
import java.util.Arrays;
import java.util.Random;

public class VerifyCodeUtils {
    //使用到Algerian字体,系统里没有的话需要安装字体,字体只显示大写,去掉了1,0,i,o几个容易混淆的字符
    public static final String VERIFY_CODES = "23456789ABCDEFGHJKLMNPQRSTUVWXYZ";
    private static Random random = new Random();


    /**
     * 使用系统默认字符源生成验证码
     *
     * @param verifySize 验证码长度
     * @return
     */
    public static String generateVerifyCode(int verifySize) {
        return generateVerifyCode(verifySize, VERIFY_CODES);
    }

    /**
     * 使用指定源生成验证码
     *
     * @param verifySize 验证码长度
     * @param sources    验证码字符源
     * @return
     */
    public static String generateVerifyCode(int verifySize, String sources) {
        if (sources == null || sources.length() == 0) {
            sources = VERIFY_CODES;
        }
        int codesLen = sources.length();
        Random rand = new Random(System.currentTimeMillis());
        StringBuilder verifyCode = new StringBuilder(verifySize);
        for (int i = 0; i < verifySize; i++) {
            verifyCode.append(sources.charAt(rand.nextInt(codesLen - 1)));
        }
        return verifyCode.toString();
    }

    /**
     * 输出指定验证码图片流
     *
     */
    public static void outputImage(int w, int h, OutputStream os, String code) throws IOException {
        int verifySize = code.length();
        BufferedImage image = new BufferedImage(w, h, BufferedImage.TYPE_INT_RGB);
        Random rand = new Random();
        Graphics2D g2 = image.createGraphics();
        g2.setRenderingHint(RenderingHints.KEY_ANTIALIASING, RenderingHints.VALUE_ANTIALIAS_ON);
        Color[] colors = new Color[5];
        Color[] colorSpaces = new Color[]{Color.WHITE, Color.CYAN,
                Color.GRAY, Color.LIGHT_GRAY, Color.MAGENTA, Color.ORANGE,
                Color.PINK, Color.YELLOW};
        float[] fractions = new float[colors.length];
        for (int i = 0; i < colors.length; i++) {
            colors[i] = colorSpaces[rand.nextInt(colorSpaces.length)];
            fractions[i] = rand.nextFloat();
        }
        Arrays.sort(fractions);

        g2.setColor(Color.GRAY);// 设置边框色
        g2.fillRect(0, 0, w, h);

        Color c = getRandColor(200, 250);
        g2.setColor(c);// 设置背景色
        g2.fillRect(0, 2, w, h - 4);

        //绘制干扰线
        Random random = new Random();
        g2.setColor(getRandColor(160, 200));// 设置线条的颜色
        for (int i = 0; i < 20; i++) {
            int x = random.nextInt(w - 1);
            int y = random.nextInt(h - 1);
            int xl = random.nextInt(6) + 1;
            int yl = random.nextInt(12) + 1;
            g2.drawLine(x, y, x + xl + 40, y + yl + 20);
        }

        // 添加噪点
        float yawpRate = 0.05f;// 噪声率
        int area = (int) (yawpRate * w * h);
        for (int i = 0; i < area; i++) {
            int x = random.nextInt(w);
            int y = random.nextInt(h);
            int rgb = getRandomIntColor();
            image.setRGB(x, y, rgb);
        }

        shear(g2, w, h, c);// 使图片扭曲

        g2.setColor(getRandColor(100, 160));
        int fontSize = h - 4;
        Font font = new Font("Algerian", Font.ITALIC, fontSize);
        g2.setFont(font);
        char[] chars = code.toCharArray();
        for (int i = 0; i < verifySize; i++) {
            AffineTransform affine = new AffineTransform();
            affine.setToRotation(Math.PI / 4 * rand.nextDouble() * (rand.nextBoolean() ? 1 : -1), (w / verifySize) * i + fontSize / 2, h / 2);
            g2.setTransform(affine);
            g2.drawChars(chars, i, 1, ((w - 10) / verifySize) * i + 5, h / 2 + fontSize / 2 - 10);
        }

        g2.dispose();
        ImageIO.write(image, "jpg", os);
    }

    private static Color getRandColor(int fc, int bc) {
        if (fc > 255)
            fc = 255;
        if (bc > 255)
            bc = 255;
        int r = fc + random.nextInt(bc - fc);
        int g = fc + random.nextInt(bc - fc);
        int b = fc + random.nextInt(bc - fc);
        return new Color(r, g, b);
    }

    private static int getRandomIntColor() {
        int[] rgb = getRandomRgb();
        int color = 0;
        for (int c : rgb) {
            color = color << 8;
            color = color | c;
        }
        return color;
    }

    private static int[] getRandomRgb() {
        int[] rgb = new int[3];
        for (int i = 0; i < 3; i++) {
            rgb[i] = random.nextInt(255);
        }
        return rgb;
    }

    private static void shear(Graphics g, int w1, int h1, Color color) {
        shearX(g, w1, h1, color);
        shearY(g, w1, h1, color);
    }

    private static void shearX(Graphics g, int w1, int h1, Color color) {

        int period = random.nextInt(2);

        boolean borderGap = true;
        int frames = 1;
        int phase = random.nextInt(2);

        for (int i = 0; i < h1; i++) {
            double d = (double) (period >> 1)
                    * Math.sin((double) i / (double) period
                    + (6.2831853071795862D * (double) phase)
                    / (double) frames);
            g.copyArea(0, i, w1, 1, (int) d, 0);
            if (borderGap) {
                g.setColor(color);
                g.drawLine((int) d, i, 0, i);
                g.drawLine((int) d + w1, i, w1, i);
            }
        }

    }

    private static void shearY(Graphics g, int w1, int h1, Color color) {

        int period = random.nextInt(40) + 10; // 50;

        boolean borderGap = true;
        int frames = 20;
        int phase = 7;
        for (int i = 0; i < w1; i++) {
            double d = (double) (period >> 1)
                    * Math.sin((double) i / (double) period
                    + (6.2831853071795862D * (double) phase)
                    / (double) frames);
            g.copyArea(i, 0, 1, h1, 0, (int) d);
            if (borderGap) {
                g.setColor(color);
                g.drawLine(i, (int) d, i, 0);
                g.drawLine(i, (int) d + h1, i, h1);
            }

        }

    }

    /**
     * 获取随机验证码及其加密图片
     *
     */
    public static String verifyCode(int w, int h, String code){
        try {
            //base64编码器
            BASE64Encoder encoder = new BASE64Encoder();
            //准备输出流
            ByteArrayOutputStream data = new ByteArrayOutputStream();
            //使用code生成w宽 h高的图片,并将结果图片存入data流中
            outputImage(w, h, data, code);
            //使用base64编码成String
            return encoder.encode(data.toByteArray());
        } catch (IOException e) {
            e.printStackTrace();
            throw new BusinessException("生成验证码失败!");
        }
    }

    public static void main(String[] args) throws  Exception{
        System.out.println(verifyCode(100, 30, "1234"));
    }
}
②StrUtils
package io.coderyeah.basic.util;

import java.util.ArrayList;
import java.util.List;
import java.util.Random;


public class StrUtils {
    /**
     * 把逗号分隔的字符串转换字符串数组
     *
     * @param str
     * @return
     */
    public static String[] splitStr2StrArr(String str,String split) {
        if (str != null && !str.equals("")) {
            return str.split(split);
        }
        return null;
    }


    /**
     * 把逗号分隔字符串转换List的Long
     *
     * @param str
     * @return
     */
    public static List<Long> splitStr2LongArr(String str) {
        String[] strings = splitStr2StrArr(str,",");
        if (strings == null) return null;
        List<Long> result = new ArrayList<>();
        for (String string : strings) {
            result.add(Long.parseLong(string));
        }

        return result;
    }
    /**
     * 把逗号分隔字符串转换List的Long
     *
     * @param str
     * @return
     */
    public static List<Long> splitStr2LongArr(String str,String split) {
        String[] strings = splitStr2StrArr(str,split);
        if (strings == null) return null;

        List<Long> result = new ArrayList<>();
        for (String string : strings) {
            result.add(Long.parseLong(string));
        }
        return result;
    }

    public static String getRandomString(int length) {
        String str = "0123456789";
        Random random = new Random();
        StringBuffer sb = new StringBuffer();
        for (int i = 0; i < length; i++) {
            int number = random.nextInt(10);
            sb.append(str.charAt(number));
        }
        return sb.toString();

    }

    public static String getComplexRandomString(int length) {
        String str = "abcdefghijklmnopqrstuvwxyzABCDEFGHIJKLMNOPQRSTUVWXYZ0123456789";
        Random random = new Random();
        StringBuffer sb = new StringBuffer();
        for (int i = 0; i < length; i++) {
            int number = random.nextInt(62);
            sb.append(str.charAt(number));
        }
        return sb.toString();
    }

    public static String convertPropertiesToHtml(String properties){
        //1:容量:6:32GB_4:样式:12:塑料壳
        StringBuilder sBuilder = new StringBuilder();
        String[] propArr = properties.split("_");
        for (String props : propArr) {
            String[] valueArr = props.split(":");
            sBuilder.append(valueArr[1]).append(":").append(valueArr[3]).append("<br>");
        }
        return sBuilder.toString();
    }

}
三. 数据库三范式
3FN:
1. 第一范式:列唯一
    列不可再分,保持原子性,关系型数据库默认支持
2. 第二范式:行唯一
    每一行的数据要唯一区分。怎么区分呢?需要加一列作为惟一标识。这列被称为主键
    并且行中每一列数据都与主键相关
3. 第三范式:如果一张表的数据能够通过其他表推导出来,不应该单独设计,通过外键的方式关联查询出来
    减少数据冗余

总结:三大范式只是一般设计数据库的基本理念,可以建立冗余较小、结构合理的数据库。如果有特殊情况,当然要特殊对待,数据库设计最重要的是看需求跟性能,需求>性能>表结构。所以不能一味的去追求范式建立数据库表

反3FN:
原则上是不能违反三范式的,但是有的时候我们为了增强查询效率【不用关联查询,直接单表查询】,会设计一些冗余字段,变多表查询为单表查询
如何使用百度AI智能审核
一. 什么是自动审核
针对图像、文本、语音、视频等多媒体内容,提供全方位的审核能力,覆盖涉政、涉黄、涉恐、恶意推广、低质灌水等内容自动鉴别。
以上的功能需要使用到图像识别功能。如果要自己实现是需要花费大量的时间以及人力。我们项目里面可以直接使用第三方提供的功能百度AI 的内容审核功能https://ai.baidu.com/solution/censoring
百度AI的内容审核功能:https://ai.baidu.com/solution/censoring
API文档:https://ai.baidu.com/ai-doc/ANTIPORN/Rk3h6xb3i
ps:需要自自完成注册和创建应用
二. 使用自动审核功能
第一步:获取 access_token
package com.baidu.ai.aip.auth;

import org.json.JSONObject;
import java.io.BufferedReader;
import java.io.InputStreamReader;
import java.net.HttpURLConnection;
import java.net.URL;
import java.util.List;
import java.util.Map;

/**
 * 获取token类
 */
public class AuthService {

    /**
     * 获取权限token
     * @return 返回示例:
      *
     */
    public static String getAuth() {
        // 官网获取的 API Key 更新为你注册的
        String clientId = "百度云应用的AK";
        // 官网获取的 Secret Key 更新为你注册的
        String clientSecret = "百度云应用的SK";
        return getAuth(clientId, clientSecret);
    }

    /**
     * 获取API访问token
     * 该token有一定的有效期,需要自行管理,当失效时需重新获取.
     * @param ak - 百度云官网获取的 API Key
     * @param sk - 百度云官网获取的 Secret Key
     * @return assess_token 示例:
     * "24.460da4889caad24cccdb1fea17221975.2592000.1491995545.282335-1234567"
     */
    public static String getAuth(String ak, String sk) {
        // 获取token地址
        String authHost = "https://aip.baidubce.com/oauth/2.0/token?";
        String getAccessTokenUrl = authHost
                // 1. grant_type为固定参数
                + "grant_type=client_credentials"
                // 2. 官网获取的 API Key
                + "&client_id=" + ak
                // 3. 官网获取的 Secret Key
                + "&client_secret=" + sk;
        try {
            URL realUrl = new URL(getAccessTokenUrl);
            // 打开和URL之间的连接
            HttpURLConnection connection = (HttpURLConnection) realUrl.openConnection();
            connection.setRequestMethod("GET");
            connection.connect();
            // 获取所有响应头字段
            Map<String, List<String>> map = connection.getHeaderFields();
            // 遍历所有的响应头字段
            for (String key : map.keySet()) {
                System.err.println(key + "--->" + map.get(key));
            }
            // 定义 BufferedReader输入流来读取URL的响应
            BufferedReader in = new BufferedReader(new InputStreamReader(connection.getInputStream()));
            String result = "";
            String line;
            while ((line = in.readLine()) != null) {
                result += line;
            }
            /**
             * 返回结果示例
             */
            System.err.println("result:" + result);
            JSONObject jsonObject = new JSONObject(result);
            String access_token = jsonObject.getString("access_token");
            return access_token;
        } catch (Exception e) {
            System.err.printf("获取token失败!");
            e.printStackTrace(System.err);
        }
        return null;
    }
}
第二步:利用获取的access_token 调用接口
package com.baidu.ai.aip;

import com.baidu.ai.aip.utils.HttpUtil;

/**
* 文本审核接口
*/
public class TextCensor {

    /**
    * 重要提示代码中所需工具类
    * FileUtil,Base64Util,HttpUtil,GsonUtils请从
    * https://ai.baidu.com/file/658A35ABAB2D404FBF903F64D47C1F72
    * https://ai.baidu.com/file/C8D81F3301E24D2892968F09AE1AD6E2
    * https://ai.baidu.com/file/544D677F5D4E4F17B4122FBD60DB82B3
    * https://ai.baidu.com/file/470B3ACCA3FE43788B5A963BF0B625F3
    * 下载
    */
    public static String TextCensor() {
        // 请求url
        String url = "https://aip.baidubce.com/rest/2.0/solution/v1/text_censor/v2/user_defined";
        try {
            String param = "text=" + "不要侮辱伟大的乐侃";

            // 注意这里仅为了简化编码每一次请求都去获取access_token,线上环境access_token有过期时间, 客户端可自行缓存,过期后重新获取。
            String accessToken = "[调用鉴权接口获取的token]";

            String result = HttpUtil.post(url, accessToken, param);
            System.out.println(result);
            return result;
        } catch (Exception e) {
            e.printStackTrace();
        }
        return null;
    }

    public static void main(String[] args) {
        TextCensor.TextCensor();
    }
}
package com.baidu.ai.aip; import com.baidu.ai.aip.utils.Base64Util; import com.baidu.ai.aip.utils.FileUtil; import com.baidu.ai.aip.utils.HttpUtil; import java.net.URLEncoder; /** * 图像审核接口 */ public class ImgCensor { /** * 重要提示代码中所需工具类 * FileUtil,Base64Util,HttpUtil,GsonUtils请从 * https://ai.baidu.com/file/658A35ABAB2D404FBF903F64D47C1F72 * https://ai.baidu.com/file/C8D81F3301E24D2892968F09AE1AD6E2 * https://ai.baidu.com/file/544D677F5D4E4F17B4122FBD60DB82B3 * https://ai.baidu.com/file/470B3ACCA3FE43788B5A963BF0B625F3 * 下载 */ public static String ImgCensor() { // 请求url String url = "https://aip.baidubce.com/rest/2.0/solution/v1/img_censor/v2/user_defined"; try { // 本地文件路径 String filePath = "[本地文件路径]"; byte[] imgData = FileUtil.readFileByBytes(filePath); String imgStr = Base64Util.encode(imgData); String imgParam = URLEncoder.encode(imgStr, "UTF-8"); String param = "image=" + imgParam; // 注意这里仅为了简化编码每一次请求都去获取access_token,线上环境access_token有过期时间, 客户端可自行缓存,过期后重新获取。 String accessToken = "[调用鉴权接口获取的token]"; String result = HttpUtil.post(url, accessToken, param); System.out.println(result); return result; } catch (Exception e) { e.printStackTrace(); } return null; } public static void main(String[] args) { ImgCensor.ImgCensor(); } }编写自己的工具类
package io.coderyeah.basic.util;


import com.alibaba.fastjson.JSONObject;

import java.io.BufferedReader;
import java.io.InputStreamReader;
import java.net.HttpURLConnection;
import java.net.URL;
import java.net.URLEncoder;
import java.util.List;
import java.util.Map;

/**
 * 百度认证工具类:注意要修改API Key 和 Secret Key
 */
public class BaiduAuditUtils {
    /**
     * 获取权限token
     *
     * @return 返回示例:
     * {
     * "access_token": "24.3265383f84ac64db9eff781e70587614.2592000.1654844607.282335-26205415",
     * "expires_in": 2592000
     * }
     */
    public static String getAuth() {
        // 官网获取的 API Key 更新为你注册的
        String clientId = "hNkxSg4Kg4V1DknrquZkLIg6";
        // 官网获取的 Secret Key 更新为你注册的
        String clientSecret = "mEwcQpNoVrpHvogxr0q0gZ4cqIyuH3k4";
        return getAuth(clientId, clientSecret);
    }

    /**
     * 获取API访问token
     * 该token有一定的有效期,需要自行管理,当失效时需重新获取.
     *
     * @param ak - 百度云官网获取的 API Key
     * @param sk - 百度云官网获取的 Securet Key
     * @return assess_token 示例:
     * "24.460da4889caad24cccdb1fea17221975.2592000.1491995545.282335-1234567"
     */
    public static String getAuth(String ak, String sk) {
        // 获取token地址
        String authHost = "https://aip.baidubce.com/oauth/2.0/token?";
        String getAccessTokenUrl = authHost
                // 1. grant_type为固定参数
                + "grant_type=client_credentials"
                // 2. 官网获取的 API Key
                + "&client_id=" + ak
                // 3. 官网获取的 Secret Key
                + "&client_secret=" + sk;
        try {
            URL realUrl = new URL(getAccessTokenUrl);
            // 打开和URL之间的连接
            HttpURLConnection connection = (HttpURLConnection) realUrl.openConnection();
            connection.setRequestMethod("GET");
            connection.connect();
            // 获取所有响应头字段
            Map<String, List<String>> map = connection.getHeaderFields();
            // 遍历所有的响应头字段
            for (String key : map.keySet()) {
                System.err.println(key + "--->" + map.get(key));
            }
            // 定义 BufferedReader输入流来读取URL的响应
            BufferedReader in = new BufferedReader(new InputStreamReader(connection.getInputStream()));
            String result = "";
            String line;
            while ((line = in.readLine()) != null) {
                result += line;
            }
            /**
             * 返回结果示例
             */
            System.err.println("result:" + result);
            JSONObject jsonObject = JSONObject.parseObject(result);
            String access_token = jsonObject.getString("access_token");
            return access_token;
        } catch (Exception e) {
            System.err.printf("获取token失败!");
            e.printStackTrace(System.err);
        }
        return null;
    }

    public static Boolean TextCensor(String param) {
        // 请求url
        String url = "https://aip.baidubce.com/rest/2.0/solution/v1/text_censor/v2/user_defined";
        try {
            // 注意这里仅为了简化编码每一次请求都去获取access_token,线上环境access_token有过期时间, 客户端可自行缓存,过期后重新获取。
            String accessToken = getAuth();
            //处理参数格式
            param = "text=" + param;

            String result = HttpUtil.post(url, accessToken, param);
            JSONObject jsonObject = JSONObject.parseObject(result);
            String conclusion = jsonObject.getString("conclusion");
            if ("合规".equals(conclusion)) {
                return true;
            }
        } catch (Exception e) {
            e.printStackTrace();
        }
        return false;
    }

    /**
     * @param imageUrl 需要审核的图片路径地址
     * @return
     */
    public static Boolean ImgCensor(String imageUrl) {
        // 请求url
        String url = "https://aip.baidubce.com/rest/2.0/solution/v1/img_censor/v2/user_defined";
        try {
            //图片地址进行编码
            String imgParam = URLEncoder.encode(imageUrl, "UTF-8");
            //设置参数
            String param = "imgUrl=" + imgParam;
            // 注意这里仅为了简化编码每一次请求都去获取access_token,线上环境access_token有过期时间, 客户端可自行缓存,过期后重新获取。
            String accessToken = getAuth();

            String result = HttpUtil.post(url, accessToken, param);
            JSONObject jsonObject = JSONObject.parseObject(result);
            String conclusion = jsonObject.getString("conclusion");
            if ("合规".equals(conclusion)) {
                return true;
            }
        } catch (Exception e) {
            e.printStackTrace();
        }
        return false;
    }

    public static void main(String[] args) {
        System.out.println(BaiduAuditUtils.getAuth());
        System.out.println(BaiduAuditUtils.TextCensor("操"));//false
        System.out.println(BaiduAuditUtils.TextCensor("cnm"));//false
        System.out.println(BaiduAuditUtils.TextCensor("sb"));//false
        System.out.println(BaiduAuditUtils.TextCensor("牛逼"));//true
        System.out.println(BaiduAuditUtils.TextCensor("日寇"));//true
        System.out.println(BaiduAuditUtils.TextCensor("公司"));//true
    }
}
依赖的jar
<!-- 主要用于后端发送http请求-->
<!-- 后端发送http请求 - 一般用在调用三方接口时会用 -->
<dependency>
    <groupId>commons-httpclient</groupId>
    <artifactId>commons-httpclient</artifactId>
    <version>3.1</version>
</dependency>

<!-- https://mvnrepository.com/artifact/com.alibaba/fastjson -->
<!-- 一般调用三方接口响应的都是json字符串,后端可以通过fastjson将json字符串转成json对象获取响应信息 -->
<dependency>
    <groupId>com.alibaba</groupId>
    <artifactId>fastjson</artifactId>
    <version>1.2.58</version>
</dependency>
Http工具类
package io.coderyeah.basic.util;

import java.io.BufferedReader;
import java.io.DataOutputStream;
import java.io.InputStreamReader;
import java.net.HttpURLConnection;
import java.net.URL;
import java.util.List;
import java.util.Map;

/**
 * http 工具类
 */
public class HttpUtil {

    public static String post(String requestUrl, String accessToken, String params)
            throws Exception {
        String contentType = "application/x-www-form-urlencoded";
        return HttpUtil.post(requestUrl, accessToken, contentType, params);
    }

    public static String post(String requestUrl, String accessToken, String contentType, String params)
            throws Exception {
        String encoding = "UTF-8";
        if (requestUrl.contains("nlp")) {
            encoding = "GBK";
        }
        return HttpUtil.post(requestUrl, accessToken, contentType, params, encoding);
    }

    public static String post(String requestUrl, String accessToken, String contentType, String params, String encoding)
            throws Exception {
        String url = requestUrl + "?access_token=" + accessToken;
        return HttpUtil.postGeneralUrl(url, contentType, params, encoding);
    }

    public static String postGeneralUrl(String generalUrl, String contentType, String params, String encoding)
            throws Exception {
        URL url = new URL(generalUrl);
        // 打开和URL之间的连接
        HttpURLConnection connection = (HttpURLConnection) url.openConnection();
        connection.setRequestMethod("POST");
        // 设置通用的请求属性
        connection.setRequestProperty("Content-Type", contentType);
        connection.setRequestProperty("Connection", "Keep-Alive");
        connection.setUseCaches(false);
        connection.setDoOutput(true);
        connection.setDoInput(true);

        // 得到请求的输出流对象
        DataOutputStream out = new DataOutputStream(connection.getOutputStream());
        out.write(params.getBytes(encoding));
        out.flush();
        out.close();

        // 建立实际的连接
        connection.connect();
        // 获取所有响应头字段
        Map<String, List<String>> headers = connection.getHeaderFields();
        // 遍历所有的响应头字段
        for (String key : headers.keySet()) {
            System.err.println(key + "--->" + headers.get(key));
        }
        // 定义 BufferedReader输入流来读取URL的响应
        BufferedReader in = null;
        in = new BufferedReader(
                new InputStreamReader(connection.getInputStream(), encoding));
        String result = "";
        String getLine;
        while ((getLine = in.readLine()) != null) {
            result += getLine;
        }
        in.close();
        System.err.println("result:" + result);
        return result;
    }
}
业务使用
自定义业务异常
package io.coderyeah.basic.exception;

public class BusinessException extends RuntimeException {

    public BusinessException(String message) {
        super(message);
    }

    public BusinessException() {
    }
}
代码使用
           // 效验店铺名称是否违法
        if (!BaiduAuditUtils.TextCensor(shop.getName())) {
            throw new BusinessException("店铺名称不合法,请重新输入!!!");
        }
        // 效验店铺logo是否违法
        if (!BaiduAuditUtils.ImgCensor("http://123.207.27.208" + shop.getLogo())) {
            throw new BusinessException("图片不合法,请重新选择!!!");
        }
如何使用SpringBoot发送邮件
一. 发送邮件原理
发件人【设置授权码】 - SMTP协议【Simple Mail TransferProtocol - 是一种提供可靠且有效的电子邮件传输的协议】 - 收件人
二. 获取授权码
开通POP3/SMTP,获取授权码
授权码是QQ邮箱推出的,用于登录第三方客户端的专用密码。适用于登录以下服务:POP3/IMAP/SMTP/Exchange/CardDAV/CalDAV服务。
温馨提醒:为了你的帐户安全,更改QQ密码以及独立密码会触发授权码过期,需要重新获取新的授权码登录
第一步:进入邮箱设置 -> 账户 -> 生成授权码 :【注意】POP3/SMTP ,IMAP/SMTP服务都需要开启
三. SpringBoot发送邮件步骤
1. 选择一个邮件服务商:QQ - smtp.qq.com
2. 获取授权码
3. 导包
4. 配置文件
5. 注入使用JavaMailSender
注意事项:163和126邮箱要检查邮件中是否有未许可的信息,所有最好用qq邮箱作为发送方。而且发送方邮箱账号就是配置中的邮箱账号
导入依赖
<!--对邮件的支持jar-->
<dependency>
    <groupId>org.springframework.boot</groupId>
    <artifactId>spring-boot-starter-mail</artifactId>
</dependency>
配置邮箱
spring:
  servlet:
    multipart:
      #设置单个文件大小
      max-file-size: 10MB
      #设置单次请求文件的总大小
      max-request-size: 50MB
  mail:
    host: smtp.qq.com   # 设置邮箱主机(服务商),这里使用QQ邮件服务器
    username: 2399690261@qq.com  # 设置用户名 - 发送方
    password: axgjklvsrgoeeaie   # 设置密码,该处的密码是QQ邮箱开启SMTP的授权码而非QQ密码
    properties:
      mail:
        smtp:
          auth: true  # 必须进行授权认证,它的目的就是阻止他人任意乱发邮件
          starttls: #SMTP加密方式:连接到一个TLS保护连接
            enable: true
            required: true
发送邮件测试类
package io.coderyeah;

import org.junit.Test;
import org.junit.runner.RunWith;
import org.springframework.boot.test.context.SpringBootTest;
import org.springframework.mail.SimpleMailMessage;
import org.springframework.mail.javamail.JavaMailSender;
import org.springframework.mail.javamail.MimeMessageHelper;
import org.springframework.test.context.junit4.SpringRunner;

import javax.annotation.Resource;
import javax.mail.MessagingException;
import javax.mail.internet.MimeMessage;
import java.io.File;
import java.util.Date;

@SpringBootTest(classes = PetHomeApplication.class)
@RunWith(SpringRunner.class)
public class EmailTest {

    @Resource
    private JavaMailSender javaMailSender;

    /**
     * 发送简单邮件
     */
    @Test
    public void test1() {
        final SimpleMailMessage simpleMailMessage = new SimpleMailMessage();
        // 设置发送人
        simpleMailMessage.setFrom("2399690261@qq.com");
        // 设置标题
        simpleMailMessage.setSubject("新型冠状病毒防护指南");
        // 设置文件内容
        simpleMailMessage.setText("<h2>好好在家待着别到处乱跑噢.....</h2>");
        // 设置发收件人
        simpleMailMessage.setTo("3050105866@qq.com");
        // 设置发送时间
        simpleMailMessage.setSentDate(new Date());
        // 发送邮件
        javaMailSender.send(simpleMailMessage);
    }

    /**
     * 发送复杂文件
     */
    @Test
    public void test2() throws MessagingException {
        // 创建复杂邮件对象
        final MimeMessage mimeMessage = javaMailSender.createMimeMessage();
        // 发送复杂邮件工具类 true - 能够添加附件
        MimeMessageHelper helper = new MimeMessageHelper(mimeMessage, true, "utf-8");
        // 发件人
        helper.setFrom("2399690261@qq.com");
        // 邮件标题
        helper.setSubject("店铺激活邮件");
        // 邮件内容 true - 能够再内容中编写html标签 - 会解析
        helper.setText("<h3>你的店铺已经审核通过,请<a href='http://localhost:8080/shop/active/40'>点击这里</a>激活邮件</h3>", true);
        //添加附件
        helper.addAttachment("Java面试题大全.pdf",new File("C:\\Users\\coderyeah\\Desktop\\Java面试题大全.pdf"));
        helper.addAttachment("welt.jpg", new File("C:\\Users\\coderyeah\\Desktop\\welt.jpg"));
        //收件人
        helper.setTo("3050105866@qq.com");
        javaMailSender.send(mimeMessage);
    }
}
业务代码
   @Transactional
    @Override
    public Result pass(ShopAuditLog auditLog) throws MessagingException {
        // 1.店铺审核通过 将t_shop表状态修改为2表示审核通过待激活
        final Shop shop = new Shop();
        shop.setState(2);
        shopMapper.update(shop, new LambdaQueryWrapper<Shop>().eq(BaseDomain::getId, auditLog.getShopId()));
        // 2. 新增审核日志
        auditLog.setAuditId(356L); // 审核人
        auditLog.setState(2);
        auditLogMapper.insert(auditLog);
        // 3.发送激活邮件 复杂邮件
        final MimeMessage mimeMessage = javaMailSender.createMimeMessage();
        final MimeMessageHelper helper = new MimeMessageHelper(mimeMessage, true, "utf-8");
        helper.setFrom("2399690261@qq.com");
        helper.setSubject("店铺激活邮件");
        helper.setText("<h3>你的店铺已经审核通过,请<a href='http://localhost:8080/shop/active/" + auditLog.getShopId() + "'><font color='blue'>点击这里</font></a>激活邮件</h3>", true);
        final Shop shop1 = shopMapper.selectById(auditLog.getShopId()); // 待激活店铺
        // 店铺管理员
        final Employee employee = employeeMapper.selectById(shop1.getAdminId());
        helper.setTo(employee.getEmail()); //收件人
        // 发送邮件
        javaMailSender.send(mimeMessage);
        return Result.success(null);
    }