0%

一. 什么是maven?

  1. maven: 是专门用于构建和管理Java相关项目的工具;
  2. 构建:指自动构建,项目从开发到上线的一系列步骤;
  3. 管理:指管理项目包架构。

二. maven的安装

  1. Maven 是一个基于 Java 的工具,所以要使用Maven首先保证电脑的Java环境可用;

  2. 从网上下载 Maven:http://maven.apache.org/download.html;

  3. 绿色安装指解压即可用;

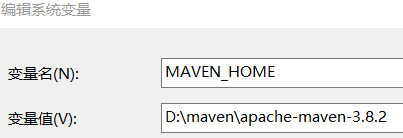
  4. 系统环境变量配置:找到自己的解压安装目录

    image-20220821205625375

  5. 配置Path:%MAVEN_HOME\bin%

    image-20220821210545648

  6. 检查是否配置成功

    mvn -v

    image-20220821210611693

三. 配置镜像和本地仓库

  1. 在maven的settings.xml文件里的mirrors节点,添加如下子节点,代表使用阿里的镜像仓库:

    <mirror>  
        <id>aliyunmaven</id>  
        <mirrorOf>*</mirrorOf>    
        <name>阿里云公共仓库</name>  
        <url>https://maven.aliyun.com/repository/public</url>  
    </mirror>
    
  2. 在maven安装目录下新建localRepository文件夹,在配置文件中增加<localRepository>D:/maven/localRepository</localRepository>

    image-20220821210508608

四. maven的常用命令

  1. mvn compile命令:编译项目,生成编译文件
  2. mvn clean命令:清除项目编译文件
  3. mvn clean compile命令:先清除,后编译
  4. mvn clean test:测试命令,会自动找到 src/test/java下的测试类执行
  5. mvn clean package:打包命令,把当前项目打成jar包
  6. mvn source:jar:打源码包命令
  7. mvn install:将项目打成jar包,放到本地仓库
  8. mvn package -Dmaven.test.skip=true:maven打包不执行测试用例的命令

五. pom.xml

<project xmlns="http://maven.apache.org/POM/4.0.0" xmlns:xsi="http://www.w3.org/2001/XMLSchema-instance"
    xsi:schemaLocation="http://maven.apache.org/POM/4.0.0 http://maven.apache.org/xsd/maven-4.0.0.xsd">
  
  <!-- 模型版本,创建pom配置文件就有 -->
    <modelVersion>4.0.0</modelVersion>
  
  <!-- GAV座标 -->
    <!-- 组id:一般都是公司域名反写 -->
    <groupId>cn.itsource.maven</groupId>
    <!-- 模块名:和工程名一致 -->
    <artifactId>Hello</artifactId>
    <!-- 项目项目版本 
    SNAPSHOT快照,不稳定,随时都在修改bug
    RELEASE 释放,稳定版本-->
    <version>0.0.1-SNAPSHOT</version>
  
    <!-- 项目名 -->
    <name>Hello</name>
  
    <!-- jar文件依赖 -->
    <dependencies>
        <dependency>
            <groupId>junit</groupId>
            <artifactId>junit</artifactId>
            <version>4.10</version>
            <!-- 只能在测试里面使用src/test/java -->
            <scope>test</scope>
        </dependency>
    </dependencies>
</project>

一. 什么是会话

  1. 用户开一个浏览器,访问某一个web站点,在这个站点点击多个超链接,访问服务器多个web资源,然后关闭浏览器,整个过程称之为一次会话。
  2. 客户端与服务端的多次请求和响应的一个过程称之为一次会话,一次会话可以有多次请求。

二. Cookie使用

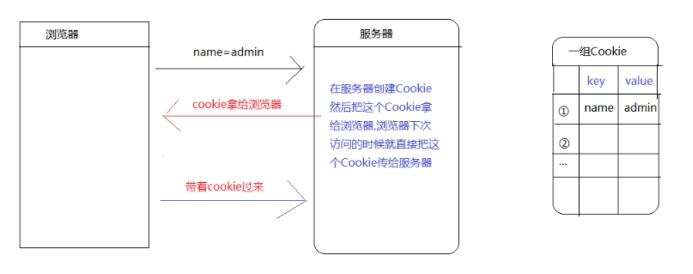
img

image-20220817185832780

  1. 创建cookie

        @RequestMapping("/add-cookie")
        @ResponseBody
        public void addCookie(HttpServletResponse resp) {
            //创建cookie对象
            final Cookie cookie = new Cookie("name", "coderyeah");
            //响应给客户端浏览器
            resp.addCookie(cookie);
        }
    
  2. 获取cookie

        @RequestMapping("/get-cookie")
        @ResponseBody
        public void getCookie(HttpServletRequest req) throws UnsupportedEncodingException {
            //获取所有cookie数组
            final Cookie[] cookies = req.getCookies();
            for (Cookie cookie : cookies) {
                //解码 对于中文需要编码和解码
                System.out.println(cookie.getName() + " : " + URLDecoder.decode(cookie.getValue(), "UTF-8"));//解码
            }
        }
    
  3. 修改cookie

     @RequestMapping(value = "/modify-cookie", produces = "application/json;charset=utf-8")
        @ResponseBody
        public void modifyCookie(HttpServletResponse resp) throws UnsupportedEncodingException {
            //因为K-V键唯一可以通过覆盖的方式修改cookie
            //编码
            final String encode = URLEncoder.encode("喜羊羊", "UTF-8");
            final Cookie cookie = new Cookie("name", encode);
            //设置cookie有效期 单位秒
            //1.正数:代表多少秒
            //2.0:就代表删除
            //3.负数:关闭浏览器时cookie失效
            cookie.setMaxAge(60 * 60 * 24 * 7);//一周
            //设置cookie作用域
            cookie.setPath("/");//根目录 整个服务器起作用
            resp.addCookie(cookie);
        }
    
  4. 删除cookie

      cookie.setMaxAge(0);
    

三. cookie优缺点

  1. 缺点:
    • 不安全,cookie存在客户端;
    • 操作中文麻烦,需要编码和解码;
    • cookie不能操作对象,只能操作字符串;
    • cookie大小限制在4kb之内;
    • 一台服务器在一个客户端最多保存20个Cookie;
    • 一个浏览器最多可以保存300个Cookie。
  2. 优点:
    • 提升用户体验感;
    • 可以设置保存很长的时间,降低服务器的压力。

四. session

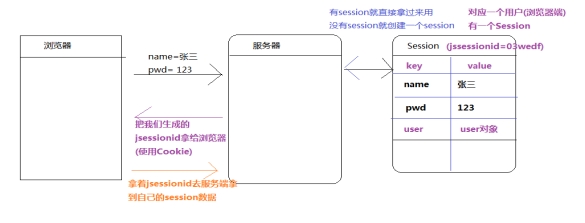
  1. session原理

    img

  2. session理解

    (1) Session是把数据保存到服务器端;

    (2) Session底层依然使用Cookie。

  3. 创建session

    HttpSession session = req.getSession();

    (1) 如果有session,那么直接拿到session;

    (2) 如果没有session,创建一个session,再拿到这个session;

  4. session的api

    • 设置值:session.setAttribute(String key, Object obj);
    • 获取指定的数据:req.getSession().getAttribute(String key);
    • 移除指定数据:根据一个key删除session中的一条记录, req.getSession().removeAttribute("name");
    • 销毁整个Session对象: req.getSession().invalidate();
  5. session的生命周期

    出生:创建Session对象;

    销毁:销毁session对象。

    ① 调用session对象的invalidate()方法:登出/注销

    ② 过期时间结束【从不操作开始算起】:最大非活动间隔

    (1) 代码方式:session.setMaxInactiveInterval(int s)

    (2) web.xml方式:,单位是分钟

         全局session时间 默认30分钟  
        <session-config>
            <session-timeout>30</session-timeout>
        </session-config>
    

    (3) 默认是30分钟,在Tomcat的web.xml查看

  6. session优缺点

    • 优点:
      • 由于session是将数据保存在服务器端,安全性高相对较高;
      • 大小相对于Cookie来说大得多;
      • 数据类型没有限制;
    • 缺点:
      • 数据量太大,会影响服务器的性能

五. 用户登录主要功能代码案例

@Service
public class UserServiceImpl implements UserService {
    @Autowired
    private UserMapper userMapper;

    @Override
    public AjaxResult getUser(User user, HttpSession session, Integer remember, HttpServletResponse resp) {
        User u = userMapper.getUser(user);
        if (u == null) {
            return AjaxResult.error("登录失败:用户名或密码错误!");
//            throw new RuntimeException("登录失败:用户名或密码错误!");
        } else {
            //存入session
            session.setAttribute("USER_INFO", u);
            if (remember != null) {
                //响应cookie给浏览器
                final Cookie c1 = new Cookie("username", u.getUsername());
                final Cookie c2 = new Cookie("password", u.getPassword());
                //设置有效期
                c1.setMaxAge(60 * 60 * 24 * 7);
                c2.setMaxAge(60 * 60 * 24 * 7);
                //设置作用域
                c1.setPath("/");
                c2.setPath("/");
                resp.addCookie(c1);
                resp.addCookie(c2);
            } else {//清空cookie
                //响应cookie给浏览器
                final Cookie c1 = new Cookie("username", u.getUsername());
                final Cookie c2 = new Cookie("password", u.getPassword());
                //设置有效期
                c1.setMaxAge(0);
                c2.setMaxAge(0);
                //设置作用域
                c1.setPath("/");
                c2.setPath("/");
                resp.addCookie(c1);
                resp.addCookie(c2);
            }
            return AjaxResult.success();
        }
    }
}
$(function () {//页面加载事件
    //记住密码
    remember();
    $('#loginButton').click(function () {
        login();
    });
    /**
     *通过回车实现登录
     * e表示事件源 keypress就是一个事件源 13表示键盘回车符代码
     */
    $(document).on('keypress', function (e) {
        if (e.keyCode == 13) {
            login();
        }
    })

    function login() {//登录函数
        //通过表单发送Ajax请求
        $('#loginForm').ajaxSubmit({
            success: function (res) {
                if (res.success) {
                    //登录成功
                    location.href = "/system/index";
                } else {
                    alert(res.msg);
                }
            }
        });
    }

    //记住密码
    function remember() {
        if (document.cookie.indexOf('username') != -1) {//存在cookie
            //document.cookie='username=root; password=123'
            var username = document.cookie.split(';')[0].split('=')[1];
            var password = document.cookie.split(';')[1].split('=')[1];
            //设置默认值
            $('#username').val(username);
            $('#password').val(password);
            $('#remember').prop('checked', true);
        }
    }
})

Nacos安装指南

1.Windows安装

开发阶段采用单机安装即可。

1.1.下载安装包

在Nacos的GitHub页面,提供有下载链接,可以下载编译好的Nacos服务端或者源代码:

GitHub主页:https://github.com/alibaba/nacos

GitHub的Release下载页:https://github.com/alibaba/nacos/releases

如图:

image-20210402161102887

本课程采用1.4.1.版本的Nacos,课前资料已经准备了安装包:

image-20210402161130261

windows版本使用nacos-server-1.4.1.zip包即可。

1.2.解压

将这个包解压到任意非中文目录下,如图:

image-20210402161843337

目录说明:

  • bin:启动脚本
  • conf:配置文件

1.3.端口配置

Nacos的默认端口是8848,如果你电脑上的其它进程占用了8848端口,请先尝试关闭该进程。

如果无法关闭占用8848端口的进程,也可以进入nacos的conf目录,修改配置文件中的端口:

image-20210402162008280

修改其中的内容:

image-20210402162251093

1.4.启动

启动非常简单,进入bin目录,结构如下:

image-20210402162350977

然后执行命令即可:

  • windows命令:

    startup.cmd -m standalone
    

执行后的效果如图:

image-20210402162526774

1.5.访问

在浏览器输入地址:http://127.0.0.1:8848/nacos即可:

image-20210402162630427

默认的账号和密码都是nacos,进入后:

image-20210402162709515

2.Linux安装

Linux或者Mac安装方式与Windows类似。

2.1.安装JDK

Nacos依赖于JDK运行,索引Linux上也需要安装JDK才行。

上传jdk安装包:

image-20210402172334810

上传到某个目录,例如:/usr/local/

然后解压缩:

tar -xvf jdk-8u144-linux-x64.tar.gz

然后重命名为java

配置环境变量:

export JAVA_HOME=/usr/local/java
export PATH=$PATH:$JAVA_HOME/bin

设置环境变量:

source /etc/profile

2.2.上传安装包

如图:

image-20210402161102887

也可以直接使用课前资料中的tar.gz:

image-20210402161130261

上传到Linux服务器的某个目录,例如/usr/local/src目录下:

image-20210402163715580

2.3.解压

命令解压缩安装包:

tar -xvf nacos-server-1.4.1.tar.gz

然后删除安装包:

rm -rf nacos-server-1.4.1.tar.gz

目录中最终样式:

image-20210402163858429

目录内部:

image-20210402164414827

2.4.端口配置

与windows中类似

2.5.启动

在nacos/bin目录中,输入命令启动Nacos:

sh startup.sh -m standalone

3.Nacos的依赖

父工程:

<dependency>
    <groupId>com.alibaba.cloud</groupId>
    <artifactId>spring-cloud-alibaba-dependencies</artifactId>
    <version>2.2.5.RELEASE</version>
    <type>pom</type>
    <scope>import</scope>
</dependency>

客户端:

<!-- nacos客户端依赖包 -->
<dependency>
    <groupId>com.alibaba.cloud</groupId>
    <artifactId>spring-cloud-starter-alibaba-nacos-discovery</artifactId>
</dependency>

一. 需要的POM.xml依赖

<?xml version="1.0" encoding="UTF-8"?>
<project xmlns="http://maven.apache.org/POM/4.0.0"
         xmlns:xsi="http://www.w3.org/2001/XMLSchema-instance"
         xsi:schemaLocation="http://maven.apache.org/POM/4.0.0 http://maven.apache.org/xsd/maven-4.0.0.xsd">
    <modelVersion>4.0.0</modelVersion>

    <groupId>com.lqs</groupId>
    <artifactId>spring-aop-demo</artifactId>
    <version>1.0-SNAPSHOT</version>

    <properties>
        <maven.compiler.source>8</maven.compiler.source>
        <maven.compiler.target>8</maven.compiler.target>
    </properties>

    <!-- 进行spring导包 -->
    <dependencies>
        <!--spring的核心包-->
        <dependency>
            <groupId>org.springframework</groupId>
            <artifactId>spring-core</artifactId>
            <version>4.2.5.RELEASE</version>
        </dependency>
        <!--spring上下文包-->
        <dependency>
            <groupId>org.springframework</groupId>
            <artifactId>spring-context</artifactId>
            <version>4.2.5.RELEASE</version>
        </dependency>
        <!--spring的aop支持包-->
        <dependency>
            <groupId>org.springframework</groupId>
            <artifactId>spring-aop</artifactId>
            <version>4.2.5.RELEASE</version>
        </dependency>
        <!--spring的测试包-->
        <dependency>
            <groupId>org.springframework</groupId>
            <artifactId>spring-test</artifactId>
            <version>4.2.5.RELEASE</version>
        </dependency>
        <!--面向切面支持包,Spring要支持AOP必需要导入这个包-->
        <dependency>
            <groupId>org.aspectj</groupId>
            <artifactId>aspectjweaver</artifactId>
            <version>1.8.8</version>
        </dependency>
        <!--测试包-->
        <dependency>
            <groupId>junit</groupId>
            <artifactId>junit</artifactId>
            <version>4.12</version>
        </dependency>

        <dependency>
            <groupId>org.springframework</groupId>
            <artifactId>spring-expression</artifactId>
            <version>4.2.5.RELEASE</version>
        </dependency>

        <dependency>
            <groupId>commons-logging</groupId>
            <artifactId>commons-logging</artifactId>
            <version>1.1.2</version>
        </dependency>

        <dependency>
            <groupId>org.projectlombok</groupId>
            <artifactId>lombok</artifactId>
            <version>1.18.8</version>
        </dependency>
    </dependencies>

    <build>
        <!--
                    下面这段配置是为了测试方便
              maven环境配置文件不能写在java中
              为了做测试方便好看,我想要maven也可以在java文件夹中读取配置
              下面的配置的意思是:在java代码中也读取xml文件
              但是注意:实际开发的时候不允许用这种东西
        -->
        <resources>
            <resource>
                <directory>src/main/java</directory>
                <includes>
                    <include>**/*.xml</include>
                </includes>
            </resource>
            <resource>
                <directory>src/test/java</directory>
                <includes>
                    <include>**/*.xml</include>
                </includes>
            </resource>
        </resources>
    </build>
</project>

二. DI依赖注入

1. 构造器注入

  1. 1 实体类

    @Data
    public class MyBean {
        private Long id;
        private String username;
        private YouBean youBean;
    
        public MyBean(Long id, String username) {
            this.id = id;
            this.username = username;
        }
    
        public MyBean(Long id, String username, YouBean youBean) {
            this.id = id;
            this.username = username;
            this.youBean = youBean;
        }
    }
    
    @Data
    public class YouBean {
        private Long id;
        private String username;
    }
    
  2. applicationContext.xml

    <?xml version="1.0" encoding="UTF-8"?>
    <beans xmlns="http://www.springframework.org/schema/beans"
           xmlns:xsi="http://www.w3.org/2001/XMLSchema-instance"
           xmlns:context="http://www.springframework.org/schema/context"
           xmlns:aop="http://www.springframework.org/schema/aop"
           xsi:schemaLocation="http://www.springframework.org/schema/beans
           http://www.springframework.org/schema/beans/spring-beans.xsd
           http://www.springframework.org/schema/context
           http://www.springframework.org/schema/context/spring-context.xsd
           http://www.springframework.org/schema/aop
           http://www.springframework.org/schema/aop/spring-aop.xsd">
        
        <!--  默认使用无参构造 创建对象 -->
        <!--    <bean id="myBean" class="com.lqs.constructor.domain.MyBean2"/>-->
    
        <!--有参构造-->
        <bean id="myBean" class="com.lqs.constructor.domain.MyBean">
            <!--    索引    -->
            <!--        <constructor-arg index="0" value="100"/>-->
            <!--        <constructor-arg index="1" value="root"/>-->
    
            <!--属性名赋值-->
            <!--        <constructor-arg name="id" value="10086"/>-->
            <!--        <constructor-arg name="username" value="admin"/>-->
    
            <!--   通过类型注入     -->
            <!--        <constructor-arg type="java.lang.Long" value="11003"/>-->
            <!--        <constructor-arg type="java.lang.String" value="coderyeah"/>-->
    
            <constructor-arg name="id" value="10086"/>
            <constructor-arg name="username" value="admin"/>
            <!--        <constructor-arg name="youBean" ref="youBean"/>-->
    
            <!--内部bean构造器注入,不需要指定ID  但是每次地址值不同-->
            <constructor-arg name="youBean">
                <bean class="com.lqs.constructor.domain.YouBean"/>
            </constructor-arg>
        </bean>
    
        <bean id="youBean" class="com.lqs.constructor.domain.YouBean"/>
      
      </beans>
    

2. property-setter注入

2.1 Bean

@Data
@NoArgsConstructor
public class MyBean2 {
    // 简单属性
    private Long id;
    private String name;
    private Boolean sex;
    private BigDecimal salary;
    // 集合属性
    private String[] arrays;
    private List<String> list;
    private List<OtherBean> otherBeanList;
    private Set<String> set;
    private Set<OtherBean> otherBeanSet;
    //    更多用来写配置文件,Alt+回车 导包
    //    老项目,就很有可能会用到它
    private Properties props1;
    private Properties props2;
    }
public class OtherBean {
}

2.2 简单属性

<bean id="myBean2" class="com.lqs.property.domain.MyBean2">
        <property name="id" value="10086"/>
        <property name="name" value="root"/>
        <property name="sex" value="true"/>
        <property name="salary" value="8888.9999"/>
</bean>

2.3 集合属性

 <bean id="myBean2" class="com.lqs.property.domain.MyBean2">
<!--     集合属性   -->
        <property name="arrays">
            <array>
                <value>JOJO</value>
                <value>迪奥</value>
                <value>小吴</value>
            </array>
        </property>

        <property name="list">
            <list>
                <value>110</value>
                <value>119</value>
                <value>120</value>
                <value>初音未来</value>
            </list>
        </property>


        <property name="otherBeanList">
            <list>
                <!--         四个对象 三个不同       -->
                <bean class="com.lqs.property.domain.OtherBean"/>
                <bean class="com.lqs.property.domain.OtherBean"/>

                <!--     地址一样           -->
                <ref bean="otherBean"/>
                <ref bean="otherBean"/>
            </list>
        </property>

        <property name="set">
            <set>
                <value>张三</value>
                <value>李四</value>
                <value>王五</value>
                <value>王五</value>
            </set>
        </property>

        <property name="otherBeanSet">
            <set>
                <bean class="com.lqs.property.domain.OtherBean"/>
                <bean class="com.lqs.property.domain.OtherBean"/>
                <!--     自动去重复           -->
                <ref bean="otherBean"/>
                <ref bean="otherBean"/>
            </set>
        </property>
 </bean>

2.4 properties

 <bean id="myBean2" class="com.lqs.property.domain.MyBean2">
<property name="props1">
            <!--     支持中文       -->
            <props>
                <prop key="1">001</prop>
                <prop key="2">002</prop>
                <prop key="特点">自律</prop>
            </props>
        </property>

        <!--    不支持中文    -->
        <property name="props2">
            <value>
                name=admin
                id=007
                sex="true"
            </value>
        </property>
  </bean>

三. AOP

1. 什么是AOP

AOP:全称是Aspect Oriented Programming 即:面向切面编程。通过预编译方式和运行期动态代理实现程序功能的统一维护的一种技术。AOP是OOP的延续,是软件开发中的一个热点,也是Spring框架中的一个重要内容,是函数式编程的一种衍生泛型。利用AOP可以对业务逻辑的各部分进行隔离,从而使得业务逻辑各部分之间的耦合度降低,提高程序的可重用性,同时提高了开发的效率。

简单的说它就是把我们程序重复的代码抽取出来,在需要执行的时候,使用动态代理的技术,在不修改源码的基础上,对我们的已有方法进行增强。

2. AOP实现方式

  • 使用动态代理技术。

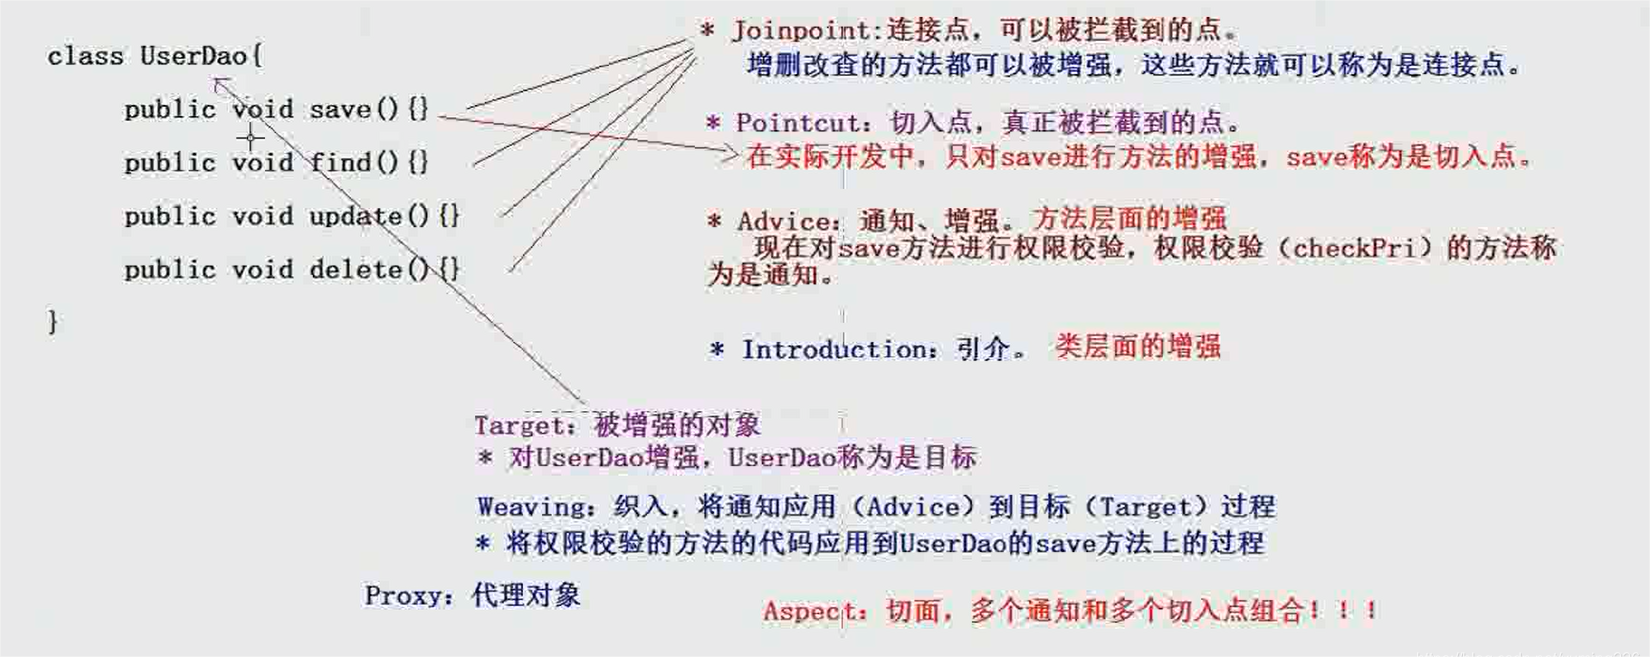
    1

3. 代理模式

  • SpringAOP底层是使用了代理模式对我们的方法进行增强;
  • 代理模式分类:
    • 静态代理:作用不大,只能代理或增强一个方法,比较鸡肋
    • 动态代理:功能强大,有两种方案,Spring会自动选择使用那种方案
      • 方案一:原生JDK的方式,在我们的类实现了接口之后,就会使用这种方式,spring使用JDK的java.lang.reflect.Proxy类代理,推荐使用,更加解耦
      • 方案二:我如果我们的类没有实现接口,那么Spring使用CGLIB库生成目标对象的子类。

四. aop的xml实现方式

  1. Bean

    @Component
    public class TxManager {
        public void begin() {
            System.out.println("开启事务......");
        }
    
        public void commit() {
            System.out.println("提交事务......");
        }
    
        public void rollback(Throwable e) {
            System.out.println("回滚事务......");
            System.out.println(e.getMessage());
        }
    
        public void close() {
            System.out.println("关闭连接......");
        }
        
        //环绕通知
        public void around(ProceedingJoinPoint joinPoint) {
            begin();
            try {
                joinPoint.proceed();
                commit();
            } catch (Throwable e) {
                e.printStackTrace();
                rollback(e);
            } finally {
                close();
            }
        }
    }
    
  2. 接口

    package com.lqs.aop_xml.service;
    
    public interface IUserService {
        void add();
    
        void update();
    
        void delete();
    }
    
  3. 配置

    <!--  aop配置  -->
        <aop:config>
            <!--  声明切点
              *:方法返回不限制
              ..:参数不做限制
              expression="execution(* com.lqs.aop_xml.service.IUserService.add(..)
              -->
            <aop:pointcut id="pointcut" expression="execution(* com.lqs.aop_xml.service.IUserService.*(..))"/>
            <!--   配置切面  增强类   -->
            <aop:aspect ref="txManager">
                <!--      在add()方法之前执行begin操作      -->
                <!--            <aop:before method="begin" pointcut-ref="pointcut"/>-->
                <!--     业务方法之后 执行      -->
                <!--            <aop:after-returning method="commit" pointcut-ref="pointcut"/>-->
                <!--发生异常-->
                <!--            <aop:after-throwing method="rollback" pointcut-ref="pointcut" throwing="e"/>-->
                <!--     最后执行       -->
                <!--            <aop:after method="close" pointcut-ref="pointcut"/>-->
    
                <!--     环绕通知强大 可代替以上通知       -->
                <aop:around method="around" pointcut-ref="pointcut"/>
            </aop:aspect>
        </aop:config>
    

五. aop的注解实现方式

  1. 配置注解扫描路径和开启动态代理

    <context:component-scan base-package="com.lqs.aop_xml"/>
    <context:component-scan base-package="com.lqs.aop_anno"/>
    <!--开启AspectJ 自动代理-->
    <aop:aspectj-autoproxy/>
    
  2. 增强类

    package com.lqs.aop_anno;
    
    import org.aspectj.lang.ProceedingJoinPoint;
    import org.aspectj.lang.annotation.*;
    import org.springframework.stereotype.Component;
    
    @Component
    @Aspect//定义一个切面
    public class TxManager2 {
        //定义切点 空的方法体
        @Pointcut("execution(* com.lqs.aop_anno.service.IUserService2.*(..))")
        public void pointCut() {
        }
    
    
        //    @Before("pointCut()")
        public void begin() {
            System.out.println("开启事务......");
        }
    
        //    @AfterReturning("pointCut()")
        public void commit() {
            System.out.println("提交事务......");
        }
    
        //    @AfterThrowing(value = "pointCut()", throwing = "e")
        public void rollback(Throwable e) {
            System.out.println("回滚事务......");
            System.out.println(e.getMessage());
        }
    
    //        @After("pointCut()")
        public void close() {
            System.out.println("关闭连接......");
        }
    
        //环绕通知  不与其它通知一起用
        @Around("pointCut()")
        public void around(ProceedingJoinPoint joinPoint) {
            begin();
            try {
                joinPoint.proceed();
                commit();
            } catch (Throwable e) {
                e.printStackTrace();
                rollback(e);
            } finally {
                close();
            }
        }
    }
    

六. spring创建bean的四种方式

  1. 普通方式-通过公共无参进行实例化

    <?xml version="1.0" encoding="UTF-8"?>
    <beans xmlns="http://www.springframework.org/schema/beans"
           xmlns:xsi="http://www.w3.org/2001/XMLSchema-instance"
           xsi:schemaLocation="http://www.springframework.org/schema/beans
           http://www.springframework.org/schema/beans/spring-beans.xsd">
    
        <!-- spring创建bean的四种方式:
                1.以前的方式,在xml中进行配置,或者是注解方式进行扫描
                2.使用静态方法工厂模式:当你要使用的类无法通过new创建出来,而只能通过工厂获取,比如sqlSession
                3.使用普通方法工厂模式
                4.使用FacctoryBean方式
           -->
    
        <bean id="myBean" class="com.lqs.bean.domain.MyBean"/>
    
    </beans>
    
  2. 集成静态简单工厂

    // 此工厂生产MyBean
    public class MyBeanFactory {
        // 此方法是一个静态方法,用来生产MyBean
        public static MyBean getMyBean(){
            return  new MyBean();
        }
    }
    
     <!-- 注入的是getMyBean方法的返回值 不是MyFactoryBean  -->
            <bean class="com.lqs.bean.MyFactoryBean" factory-method="getMyBean"/>
    
  3. 集成实例简单工厂

    • 与第二种的区别就是,当你的工厂方法不是静态方法时,无法通过类名.方法名调用

      public class MyFactoryBean {
      //    public static MyBean getMyBean() {
      //        return new MyBean();
      //    }
      
          public  MyBean getMyBean() {
              return new MyBean();
          }
      }
      
       <!--  普通方法创建bean  -->
              <bean id="myFactoryBean" class="com.lqs.bean.MyFactoryBean"/>
           <bean id="myBean" factory-bean="myFactoryBean" factory-method="getMyBean"/>
      
  4. 使用FactoryBean

    package com.lqs.bean;
    
    import com.lqs.bean.domain.MyBean;
    import org.springframework.beans.factory.FactoryBean;
    
    // FactoryBean<MyBean>:实现一个FactoryBean接口,并指定要生产的Bean对象
    public class MyBeanFactoryBean implements FactoryBean<MyBean> {
      
        // 此方法指定你要生产的bean对象
        public MyBean getObject() throws Exception {
            return new MyBean();
        }
        // 此方法指定你生产的bean的类型,必须指定否则报错
        public Class<?> getObjectType() {
            return MyBean.class;
        }
        // 此方法指定你生产的bean是否是单例的,默认false
        public boolean isSingleton() {
            return true;
        }
    }
    
    <!--使用MyBeanFactoryBean方式创建bean-->
        <bean id="myBeanFactoryBean" class="com.lqs.bean.MyBeanFactoryBean"/>
    

七. FactoryBean和BeanFactory的区别

BeanFactory是个Factory,也就是IOC容器或对象工厂,FactoryBean是个Bean。在Spring中,所有的Bean都是由BeanFactory(也就是IOC容器)来进行管理的。但对FactoryBean而言,这个Bean不是简单的Bean,而是一个能生产或者修饰对象生成的工厂Bean,它的实现与设计模式中的工厂模式和修饰器模式类似。

一. 什么是SpringBoot

  1. Spring Boot是由Pivotal团队提供的全新框架,其设计目的是用来简化Spring配置启动的。

二. SpringBoot的优势

  • 快速启动:Spring Boot内置了Web容器,可以快速启动一个Web项目
  • 简化配置:Spring Boot提供了一种特殊的方式,使得我们无需再编辑大量的配置文件,提高开发效率
  • 易上手:Spring Boot在Spring的基础上进行优化,上手非常简单
  • 无需手动管理依赖jar包的版本
    • Spring Boot把需要使用到的技术的jar包整合为一个Spring Boot Starter,并且每个Spring Boot版本都有定义好的一些默认版本,会随着Spring Boot版本的升级而升级这些技术的Jar包,也可以自定义指定版本但是不推荐。
    • springboot 1.x springboot2.x
    • 常见的Spring Boot Starter
      • spring-boot-starter-web:Web支持,其实就是springmvc简化使用,jar包组
      • Spring-boot-starter-jdbc: springboot对jdbc支持
      • Spring-boot-starter-data-jpa: springboot对data jpa支持
      • Spring-boot-starter-mybatis: springboot对mybatis支持
      • Spring-boot-starter-test:springboot对test支持
  • 注意:Spring Boot所有简化都与Maven有关,其根本是通过封装Maven方式对Spring应用开发进行进一步的封装和简化。

三. maven的父子项目

  • 父项目:只负责管理jar包,用于给子模块继承,不写任何代码;
  • 子模块:
    • 如果是公共jar包从父项目中继承,如果是本模块独有的jar包就在本模块中引入
    • 编写模块对应功能代码

四. 创建SpringBoot项目

  1. 导入依赖

    <!-- 
    Spring Boot 父节点依赖,引入这个之后相关的引入就不需要添加version配置,Spring Boot会自动选择最合适的版本进行添加
     -->
    <parent>
        <groupId>org.springframework.boot</groupId>
        <artifactId>spring-boot-starter-parent</artifactId>
        <version>2.3.9.RELEASE</version>
    </parent>
    
  2. 添加Web依赖

    • 可以添加到父项目,也可以是子模块

      <!-- 添加spring-boot-starter-web依赖,引入此依赖之后,web相关jar包全部都会引入进来 -->
      <dependency>
        <!-- SpringBoot依赖组ID,固定写法 -->
          <groupId>org.springframework.boot</groupId>
        <!-- 只要是被SpringBoot管理的jar包,那么在引入的时候都是spring-boot-starter-Xxx -->
          <artifactId>spring-boot-starter-web</artifactId>
      </dependency>
      
  3. 编写启动类

    • 启动类的位置一定要在域名包下,否则注解扫描失败。

      @SpringBootApplication//启动类
      public class DemoApp {
      
          public static void main(String[] args) {
              SpringApplication.run(DemoApp.class, args);
          }
      }
      
  4. @SpringBootApplication

    • 在启动类中的@SpringBootApplication中有一个组件扫描注解@ComponentScan,此注解会帮助我们扫描启动类同级包以及启动类一下的所有包,所以只要我们的启动类位置放对了,那么所有注解都会扫描到;由spring帮我们管理。
    • @SpringBootApplication是一个复合注解:此注解中的重要注解
      • @SpringBootConfiguration:标注在某个类上,表示这是一个SpringBoot的配置类
      • @EnableAutoConfiguration:告诉SpringBoot开启自动配置功能
      • @ComponentScan:组件扫描注解,SpringBoot默认配置就是去扫描启动类包及其以下所有包

五. SpringBoot启动的三种方式

  1. main方法启动-开发环境;

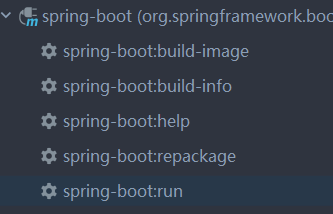
  2. 引入插件通过插件启动, 双击插件中的spring-boot-run启动。

    <!-- SpringBoot启动插件 -->
    <build>
        <plugins>
            <plugin>
                <groupId>org.springframework.boot</groupId>
                <artifactId>spring-boot-maven-plugin</artifactId>
                <configuration>
                    <!--fork :  如果没有该项配置,可能devtools不会起作用,即应用不会restart -->
                    <fork>true</fork>
                </configuration>
            </plugin>
        </plugins>
    </build>
    

    image-20220825192206303

  3. 打包运行 - 线上环境jar包位置在cmd窗口执行命令 :java -jar xxx.jar

六. SpringBoot热部署

  1. 热部署其实就是动态加载字节码,在我们修改了代码之后无需重启项目即可更改字节码,SpringBoot或者说IDEA默认是没有此功能的。

  2. 热部署原理

    • spring-boot-devtools 是一个为开发者服务的一个模块,其中最重要的功能就是自动应用代码更改到最新的App上面去。原理是在发现代码有更改之后,重新启动应用,但是速度比手动停止后再启动还要更快,更快指的不是节省出来的手工操作的时间。
    • 其深层原理是使用了两个ClassLoader,一个Classloader加载那些不会改变的类(第三方Jar包),另一个ClassLoader加载会更改的类(自己写的),称为 restart ClassLoader,这样在有代码更改的时候,原来的restart ClassLoader 被丢弃,重新创建一个restart ClassLoader,由于需要加载的类相比较少,所以实现了较快的重启时间(5秒以内)。
  3. 依赖

    <!-- SpringBoot热部署依赖 -->
    <dependency>
        <groupId>org.springframework.boot</groupId>
        <artifactId>spring-boot-devtools</artifactId>
        <optional>true</optional>
        <scope>true</scope>
    </dependency>
    
  4. 使用方式

    • 方式一:修改了代码之后,手动编译一下 —-> ctrl+F9;

    • 方式二:修改IDEA配置,让其自动编译

      1. File -> Settings -> Compiler -> Build Project automatically选中,保存

      2. Shift+Ctrl+Alt+/ ,选择 “Registry” ,选中打勾 “compiler.automake.allow.when.app.running”

        PS:方式二编译时机是IDEA失去焦点时,会自动编译,推荐使用方

七. SpringBoot配置

  1. 配置文件

    • application.properties - 传统方式,不太优美
    • application.yml/yaml - 推荐使用
  2. 配置文件作用

    • 修改SpringBoot自动配置的默认值
  3. 多种配置文件都存在时:SpringBoot优先加载yml配置文件,再加载properties配置文件,会被覆盖。properties优先级最高。

    • 如果配置的内容都相同,那么properties生效;
    • 如果配置的内容不冲突,那么都生效;
  4. 简单配置

    server:
      # 配置端口号
      port: 8088
      servlet:
        # 配置上下文路径
        context-path: /yml
    
  5. 两种多模式配置方式

    • 方式一:yml多文档块模式 多个环境之间需要以 — 隔开

      # 指定启用那个环境
      spring:
        profiles:
            # 启用环境的名称
          active: test
      
      ---
      server:
        # 配置端口号
        port: 8081
      # 指定此环境名称
      spring:
        # 开发环境
        profiles: dev
      # 多个环境之间需要以 --- 隔开
      ---
      
      server:
        port: 8082
      # 指定此环境的名称
      spring:
        # 测试环境
        profiles: test
      
      # 多个环境之间需要以 --- 隔开
      ---
      
      server:
        port: 8083
      # 指定此环境的名称
      spring:
        # 线上环境
        profiles: pro
      
    • 方式二:多profile文件模式

      • 不同的环境写在不同的YML文件中
        • 命名规范:application-{profiles}.yml
      • 在主YML文件中进行引用。

八. SpringBoot测试

  1. 引入SpringBoot测试包

    <!-- SpringBoot测试依赖包 -->
    <dependency>
          <groupId>org.springframework.boot</groupId>
          <artifactId>spring-boot-starter-test</artifactId>
    </dependency>
    
  2. 创建SpringBoot测试类

    // 表示把JUnit测试运行在Spring容器中,并且SpringBoot无需指定JUnit版本,对任何版本都支持
    @RunWith(SpringRunner.class)
    // 被@SpringBootApplication修饰的类不仅是一个启动类,同时也是一个配置类,所以我们只需要告诉SpringBoot测试,我们的启动类是谁即可
    @SpringBootTest(classes = Application.class)
    public class SpringbootTest {
    
        @Autowired
        private MyBean myBean;
    
        @Test
        public void test(){
            System.out.println(myBean);
        }
    
    }
    

九 SpringBoot集成mybatis

  1. 依赖

               <dependency>
                <groupId>org.mybatis.spring.boot</groupId>
                <artifactId>mybatis-spring-boot-starter</artifactId>
                <version>2.2.2</version>
            </dependency>
            <dependency>
                <groupId>mysql</groupId>
                <artifactId>mysql-connector-java</artifactId>
            </dependency>
    
  2. yml配置

server:
  port: 80
spring:
  datasource:
    username: root
    url: jdbc:mysql:///ssm
    password: 123456
    driver-class-name: com.mysql.cj.jdbc.Driver

mybatis:
  type-aliases-package: com.lqs.domain
  mapper-locations: classpath:com/lqs/mapper/*Mapper.xml
  configuration:
    map-underscore-to-camel-case: true #开启驼峰

logging:
  level:
    com.lqs: debug
    org.mybatis: debug

十. SpringBoot事务管理

  1. 事务:一组操作要么同时成功要么同时失败

  2. 事务应该管理在Service层,但是SpringBoot默认是没有管理Service层的事务的,所以我们需要手动开启事务。

        @Override
        @Transactional//开启事务
        public void save(Emp emp) {
            mapper.save(emp);
    //        System.out.println(1/0);
        }
    

十一. 事务传播机制

@Transactional配置

  • @Transactional注解不仅可以加在类上给当前类全局配置,还可以加在方法上,方法@Transactional注解优先级更高

    • @Transactional用在类上:类下的所有方法增删改方法 和 查询方法都进行了事务管理
    • @Transactional用在方法上:只会在当前方法生效
  • @Transactional的属性

    • Propagation propagation() default Propagation.REQUIRED; – 事务传播机制
    • boolean readOnly() default false; – 是否只读,查询配置true,增删改配置false
  • 事务传播机制 参考链接:https://blog.csdn.net/weixin_44771989/article/details/123967275

    • Propagation.REQUIRED:默认,支持当前事务,如果当前没有事务,就创建一个事务,保证一定有事务 – 增删改方法使用

    • Propagation.SUPPORTS:支持当前事务,如果当前没有事务,就不使用事务 – 查询方法使用

    • Propagation.REQUIRES_NEW:新建事务,如果当前有事务,就挂起 – 不常用

    • Propagation.NEVER:不支持事务,如果当前有事务,就抛出异常 – 不常用

    • @Transactional最终配置

      • 因为在真实开发中,一个类中增删改查,查询方法占的比例最多,所以我们会在类上使用查询的全局配置,增删改在方法上单独配置;

        • 在类上配置:@Transactional(readOnly = true,propagation = Propagation.SUPPORTS) //查询的事务控制方式
      • 在方法上配置:@Transactional //默认 readOnly = false,propagation = Propagation.REQUIRED

十二. Thymeleaf

  1. Thymeleaf是一个模板技术

  2. SpringBoot-Thymeleaf

    • 依赖

      <!-- 引入thymeleaf模板依赖 -->
      <dependency>
          <groupId>org.springframework.boot</groupId>
          <artifactId>spring-boot-starter-thymeleaf</artifactId>
      </dependency>
      
  3. 默认的视图解析器前缀就在根目录下的templates文件夹下,所以我们将html代码放在根目录下的templates文件夹下即可;

  4. 默认后缀就是.html,所以Thymeleaf是以html文件为模板;

  5. 配置

      thymeleaf:
        cache: false
        encoding: utf-8
        mode: HTML5
        enabled: true
        prefix: classpath:/templates/
        suffix: .html
    
  6. 语法

    文本显示:<span th:text="${username}">Jack</span>
    对象取值:<span th:text="${user.name}"></span>
    超链接:<a th:href="@{/order/details(orderId=${obj.id},name=${obj.name})}">view</a>
    引入静态资源:
        语法:th:[href | src]@{资源在static下的目录}, 如:@{/lib/jquery.js},不填写默认的static文件夹
        例子:<link rel="stylesheet" th:href="@{/css/index.css}">
              <script th:src="@{/js/jquery-min.js}"></script>
        注意:SpringBoot项目静态资源默认要放在src/mian/resources/static/下
    判断:
        <span th:if="${user.age == 23}">
              青年
        </span>
    选中【其中一种】:    
        <td>
            <div class="input-append">
            <input name="sex" type="radio" value="男" th:checked="${student.sex=='男'}" />男
            <input name="sex" type="radio" value="女" th:checked="${student.sex=='女'}" />女
            </div>
        </td>
    循环:
     <tr th:each="emp : ${emps}">
         <td th:text="${emp.id}">1</td>
         <td th:text="${emp.name}">海</td>
         <td th:text="${emp.age}">18</td>
    </tr>
    

0.安装Docker

Docker 分为 CE 和 EE 两大版本。CE 即社区版(免费,支持周期 7 个月),EE 即企业版,强调安全,付费使用,支持周期 24 个月。

Docker CE 分为 stable testnightly 三个更新频道。

官方网站上有各种环境下的 安装指南,这里主要介绍 Docker CE 在 CentOS上的安装。

1.CentOS安装Docker

Docker CE 支持 64 位版本 CentOS 7,并且要求内核版本不低于 3.10, CentOS 7 满足最低内核的要求,所以我们在CentOS 7安装Docker。

1.1.卸载(可选)

如果之前安装过旧版本的Docker,可以使用下面命令卸载:

yum remove docker \
                  docker-client \
                  docker-client-latest \
                  docker-common \
                  docker-latest \
                  docker-latest-logrotate \
                  docker-logrotate \
                  docker-selinux \
                  docker-engine-selinux \
                  docker-engine \
                  docker-ce

1.2.安装docker

首先需要大家虚拟机联网,安装yum工具

yum install -y yum-utils \
           device-mapper-persistent-data \
           lvm2 --skip-broken

然后更新本地镜像源:

# 设置docker镜像源
yum-config-manager \
    --add-repo \
    https://mirrors.aliyun.com/docker-ce/linux/centos/docker-ce.repo
    
sed -i 's/download.docker.com/mirrors.aliyun.com\/docker-ce/g' /etc/yum.repos.d/docker-ce.repo

yum makecache fast

然后输入命令:

yum install -y docker-ce

docker-ce为社区免费版本。稍等片刻,docker即可安装成功。

1.3.启动docker

Docker应用需要用到各种端口,逐一去修改防火墙设置。非常麻烦,因此建议大家直接关闭防火墙!

启动docker前,一定要关闭防火墙后!!

启动docker前,一定要关闭防火墙后!!

启动docker前,一定要关闭防火墙后!!

# 关闭
systemctl stop firewalld
# 禁止开机启动防火墙
systemctl disable firewalld

通过命令启动docker:

systemctl start docker  # 启动docker服务

systemctl stop docker  # 停止docker服务

systemctl restart docker  # 重启docker服务

然后输入命令,可以查看docker版本:

docker -v

如图:

image-20210418154704436

1.4.配置镜像加速

docker官方镜像仓库网速较差,我们需要设置国内镜像服务:

参考阿里云的镜像加速文档:https://cr.console.aliyun.com/cn-hangzhou/instances/mirrors

2.CentOS7安装DockerCompose

2.1.下载

Linux下需要通过命令下载:

# 安装
curl -L https://github.com/docker/compose/releases/download/1.23.1/docker-compose-`uname -s`-`uname -m` > /usr/local/bin/docker-compose

如果下载速度较慢,或者下载失败,可以使用课前资料提供的docker-compose文件:

image-20210417133020614

上传到/usr/local/bin/目录也可以。

2.2.修改文件权限

修改文件权限:

# 修改权限
chmod +x /usr/local/bin/docker-compose

2.3.Base自动补全命令:

# 补全命令
curl -L https://raw.githubusercontent.com/docker/compose/1.29.1/contrib/completion/bash/docker-compose > /etc/bash_completion.d/docker-compose

如果这里出现错误,需要修改自己的hosts文件:

echo "199.232.68.133 raw.githubusercontent.com" >> /etc/hosts

3.Docker镜像仓库

搭建镜像仓库可以基于Docker官方提供的DockerRegistry来实现。

官网地址:https://hub.docker.com/_/registry

3.1.简化版镜像仓库

Docker官方的Docker Registry是一个基础版本的Docker镜像仓库,具备仓库管理的完整功能,但是没有图形化界面。

搭建方式比较简单,命令如下:

docker run -d \
    --restart=always \
    --name registry    \
    -p 5000:5000 \
    -v registry-data:/var/lib/registry \
    registry

命令中挂载了一个数据卷registry-data到容器内的/var/lib/registry 目录,这是私有镜像库存放数据的目录。

访问http://YourIp:5000/v2/_catalog 可以查看当前私有镜像服务中包含的镜像

3.2.带有图形化界面版本

使用DockerCompose部署带有图象界面的DockerRegistry,命令如下:

version: '3.0'
services:
  registry:
    image: registry
    volumes:
      - ./registry-data:/var/lib/registry
  ui:
    image: joxit/docker-registry-ui:static
    ports:
      - 8080:80
    environment:
      - REGISTRY_TITLE=传智教育私有仓库
      - REGISTRY_URL=http://registry:5000
    depends_on:
      - registry

3.3.配置Docker信任地址

我们的私服采用的是http协议,默认不被Docker信任,所以需要做一个配置:

# 打开要修改的文件
vi /etc/docker/daemon.json
# 添加内容:
"insecure-registries":["http://192.168.150.101:8080"]
# 重加载
systemctl daemon-reload
# 重启docker
systemctl restart docker

RabbitMQ

1.初识MQ

1.1.同步和异步通讯

微服务间通讯有同步和异步两种方式:

同步通讯:就像打电话,需要实时响应。

异步通讯:就像发邮件,不需要马上回复。

image-20210717161939695

两种方式各有优劣,打电话可以立即得到响应,但是你却不能跟多个人同时通话。发送邮件可以同时与多个人收发邮件,但是往往响应会有延迟。

1.1.1.同步通讯

我们之前学习的Feign调用就属于同步方式,虽然调用可以实时得到结果,但存在下面的问题:

image-20210717162004285

总结:

同步调用的优点:

  • 时效性较强,可以立即得到结果

同步调用的问题:

  • 耦合度高
  • 性能和吞吐能力下降
  • 有额外的资源消耗
  • 有级联失败问题

1.1.2.异步通讯

异步调用则可以避免上述问题:

我们以购买商品为例,用户支付后需要调用订单服务完成订单状态修改,调用物流服务,从仓库分配响应的库存并准备发货。

在事件模式中,支付服务是事件发布者(publisher),在支付完成后只需要发布一个支付成功的事件(event),事件中带上订单id。

订单服务和物流服务是事件订阅者(Consumer),订阅支付成功的事件,监听到事件后完成自己业务即可。

为了解除事件发布者与订阅者之间的耦合,两者并不是直接通信,而是有一个中间人(Broker)。发布者发布事件到Broker,不关心谁来订阅事件。订阅者从Broker订阅事件,不关心谁发来的消息。

image-20210422095356088

Broker 是一个像数据总线一样的东西,所有的服务要接收数据和发送数据都发到这个总线上,这个总线就像协议一样,让服务间的通讯变得标准和可控。

好处:

  • 吞吐量提升:无需等待订阅者处理完成,响应更快速

  • 故障隔离:服务没有直接调用,不存在级联失败问题

  • 调用间没有阻塞,不会造成无效的资源占用

  • 耦合度极低,每个服务都可以灵活插拔,可替换

  • 流量削峰:不管发布事件的流量波动多大,都由Broker接收,订阅者可以按照自己的速度去处理事件

缺点:

  • 架构复杂了,业务没有明显的流程线,不好管理
  • 需要依赖于Broker的可靠、安全、性能

好在现在开源软件或云平台上 Broker 的软件是非常成熟的,比较常见的一种就是我们今天要学习的MQ技术。

1.2.技术对比:

MQ,中文是消息队列(MessageQueue),字面来看就是存放消息的队列。也就是事件驱动架构中的Broker。

比较常见的MQ实现:

  • ActiveMQ
  • RabbitMQ
  • RocketMQ
  • Kafka

几种常见MQ的对比:

RabbitMQ ActiveMQ RocketMQ Kafka
公司/社区 Rabbit Apache 阿里 Apache
开发语言 Erlang Java Java Scala&Java
协议支持 AMQP,XMPP,SMTP,STOMP OpenWire,STOMP,REST,XMPP,AMQP 自定义协议 自定义协议
可用性 一般
单机吞吐量 一般 非常高
消息延迟 微秒级 毫秒级 毫秒级 毫秒以内
消息可靠性 一般 一般

追求可用性:Kafka、 RocketMQ 、RabbitMQ

追求可靠性:RabbitMQ、RocketMQ

追求吞吐能力:RocketMQ、Kafka

追求消息低延迟:RabbitMQ、Kafka

2.快速入门

2.1.安装RabbitMQ

安装RabbitMQ,参考课前资料:

image-20210717162628635

MQ的基本结构:

image-20210717162752376

RabbitMQ中的一些角色:

  • publisher:生产者
  • consumer:消费者
  • exchange个:交换机,负责消息路由
  • queue:队列,存储消息
  • virtualHost:虚拟主机,隔离不同租户的exchange、queue、消息的隔离

2.2.RabbitMQ消息模型

RabbitMQ官方提供了5个不同的Demo示例,对应了不同的消息模型:

image-20210717163332646

2.3.导入Demo工程

课前资料提供了一个Demo工程,mq-demo:

image-20210717163253264

导入后可以看到结构如下:

image-20210717163604330

包括三部分:

  • mq-demo:父工程,管理项目依赖
  • publisher:消息的发送者
  • consumer:消息的消费者

2.4.入门案例

简单队列模式的模型图:

image-20210717163434647

官方的HelloWorld是基于最基础的消息队列模型来实现的,只包括三个角色:

  • publisher:消息发布者,将消息发送到队列queue
  • queue:消息队列,负责接受并缓存消息
  • consumer:订阅队列,处理队列中的消息

2.4.1.publisher实现

思路:

  • 建立连接
  • 创建Channel
  • 声明队列
  • 发送消息
  • 关闭连接和channel

代码实现:

package cn.itcast.mq.helloworld;

import com.rabbitmq.client.Channel;
import com.rabbitmq.client.Connection;
import com.rabbitmq.client.ConnectionFactory;
import org.junit.Test;

import java.io.IOException;
import java.util.concurrent.TimeoutException;

public class PublisherTest {
    @Test
    public void testSendMessage() throws IOException, TimeoutException {
        // 1.建立连接
        ConnectionFactory factory = new ConnectionFactory();
        // 1.1.设置连接参数,分别是:主机名、端口号、vhost、用户名、密码
        factory.setHost("192.168.150.101");
        factory.setPort(5672);
        factory.setVirtualHost("/");
        factory.setUsername("itcast");
        factory.setPassword("123321");
        // 1.2.建立连接
        Connection connection = factory.newConnection();

        // 2.创建通道Channel
        Channel channel = connection.createChannel();

        // 3.创建队列
        String queueName = "simple.queue";
        channel.queueDeclare(queueName, false, false, false, null);

        // 4.发送消息
        String message = "hello, rabbitmq!";
        channel.basicPublish("", queueName, null, message.getBytes());
        System.out.println("发送消息成功:【" + message + "】");

        // 5.关闭通道和连接
        channel.close();
        connection.close();

    }
}

2.4.2.consumer实现

代码思路:

  • 建立连接
  • 创建Channel
  • 声明队列
  • 订阅消息

代码实现:

package cn.itcast.mq.helloworld;

import com.rabbitmq.client.*;

import java.io.IOException;
import java.util.concurrent.TimeoutException;

public class ConsumerTest {

    public static void main(String[] args) throws IOException, TimeoutException {
        // 1.建立连接
        ConnectionFactory factory = new ConnectionFactory();
        // 1.1.设置连接参数,分别是:主机名、端口号、vhost、用户名、密码
        factory.setHost("192.168.150.101");
        factory.setPort(5672);
        factory.setVirtualHost("/");
        factory.setUsername("itcast");
        factory.setPassword("123321");
        // 1.2.建立连接
        Connection connection = factory.newConnection();

        // 2.创建通道Channel
        Channel channel = connection.createChannel();

        // 3.创建队列
        String queueName = "simple.queue";
        channel.queueDeclare(queueName, false, false, false, null);

        // 4.订阅消息
        channel.basicConsume(queueName, true, new DefaultConsumer(channel){
            @Override
            public void handleDelivery(String consumerTag, Envelope envelope,
                                       AMQP.BasicProperties properties, byte[] body) throws IOException {
                // 5.处理消息
                String message = new String(body);
                System.out.println("接收到消息:【" + message + "】");
            }
        });
        System.out.println("等待接收消息。。。。");
    }
}

2.5.总结

基本消息队列的消息发送流程:

  1. 建立connection

  2. 创建channel

  3. 利用channel声明队列

  4. 利用channel向队列发送消息

基本消息队列的消息接收流程:

  1. 建立connection

  2. 创建channel

  3. 利用channel声明队列

  4. 定义consumer的消费行为handleDelivery()

  5. 利用channel将消费者与队列绑定

3.SpringAMQP

SpringAMQP是基于RabbitMQ封装的一套模板,并且还利用SpringBoot对其实现了自动装配,使用起来非常方便。

SpringAmqp的官方地址:https://spring.io/projects/spring-amqp

image-20210717164024967

image-20210717164038678

SpringAMQP提供了三个功能:

  • 自动声明队列、交换机及其绑定关系
  • 基于注解的监听器模式,异步接收消息
  • 封装了RabbitTemplate工具,用于发送消息

3.1.Basic Queue 简单队列模型

在父工程mq-demo中引入依赖

<!--AMQP依赖,包含RabbitMQ-->
<dependency>
    <groupId>org.springframework.boot</groupId>
    <artifactId>spring-boot-starter-amqp</artifactId>
</dependency>

3.1.1.消息发送

首先配置MQ地址,在publisher服务的application.yml中添加配置:

spring:
  rabbitmq:
    host: 192.168.150.101 # 主机名
    port: 5672 # 端口
    virtual-host: / # 虚拟主机
    username: itcast # 用户名
    password: 123321 # 密码

然后在publisher服务中编写测试类SpringAmqpTest,并利用RabbitTemplate实现消息发送:

package cn.itcast.mq.spring;

import org.junit.Test;
import org.junit.runner.RunWith;
import org.springframework.amqp.rabbit.core.RabbitTemplate;
import org.springframework.beans.factory.annotation.Autowired;
import org.springframework.boot.test.context.SpringBootTest;
import org.springframework.test.context.junit4.SpringRunner;

@RunWith(SpringRunner.class)
@SpringBootTest
public class SpringAmqpTest {

    @Autowired
    private RabbitTemplate rabbitTemplate;

    @Test
    public void testSimpleQueue() {
        // 队列名称
        String queueName = "simple.queue";
        // 消息
        String message = "hello, spring amqp!";
        // 发送消息
        rabbitTemplate.convertAndSend(queueName, message);
    }
}

3.1.2.消息接收

首先配置MQ地址,在consumer服务的application.yml中添加配置:

spring:
  rabbitmq:
    host: 192.168.150.101 # 主机名
    port: 5672 # 端口
    virtual-host: / # 虚拟主机
    username: itcast # 用户名
    password: 123321 # 密码

然后在consumer服务的cn.itcast.mq.listener包中新建一个类SpringRabbitListener,代码如下:

package cn.itcast.mq.listener;

import org.springframework.amqp.rabbit.annotation.RabbitListener;
import org.springframework.stereotype.Component;

@Component
public class SpringRabbitListener {

    @RabbitListener(queues = "simple.queue")
    public void listenSimpleQueueMessage(String msg) throws InterruptedException {
        System.out.println("spring 消费者接收到消息:【" + msg + "】");
    }
}

3.1.3.测试

启动consumer服务,然后在publisher服务中运行测试代码,发送MQ消息

3.2.WorkQueue

Work queues,也被称为(Task queues),任务模型。简单来说就是让多个消费者绑定到一个队列,共同消费队列中的消息

image-20210717164238910

当消息处理比较耗时的时候,可能生产消息的速度会远远大于消息的消费速度。长此以往,消息就会堆积越来越多,无法及时处理。

此时就可以使用work 模型,多个消费者共同处理消息处理,速度就能大大提高了。

3.2.1.消息发送

这次我们循环发送,模拟大量消息堆积现象。

在publisher服务中的SpringAmqpTest类中添加一个测试方法:

/**
     * workQueue
     * 向队列中不停发送消息,模拟消息堆积。
     */
@Test
public void testWorkQueue() throws InterruptedException {
    // 队列名称
    String queueName = "simple.queue";
    // 消息
    String message = "hello, message_";
    for (int i = 0; i < 50; i++) {
        // 发送消息
        rabbitTemplate.convertAndSend(queueName, message + i);
        Thread.sleep(20);
    }
}

3.2.2.消息接收

要模拟多个消费者绑定同一个队列,我们在consumer服务的SpringRabbitListener中添加2个新的方法:

@RabbitListener(queues = "simple.queue")
public void listenWorkQueue1(String msg) throws InterruptedException {
    System.out.println("消费者1接收到消息:【" + msg + "】" + LocalTime.now());
    Thread.sleep(20);
}

@RabbitListener(queues = "simple.queue")
public void listenWorkQueue2(String msg) throws InterruptedException {
    System.err.println("消费者2........接收到消息:【" + msg + "】" + LocalTime.now());
    Thread.sleep(200);
}

注意到这个消费者sleep了1000秒,模拟任务耗时。

3.2.3.测试

启动ConsumerApplication后,在执行publisher服务中刚刚编写的发送测试方法testWorkQueue。

可以看到消费者1很快完成了自己的25条消息。消费者2却在缓慢的处理自己的25条消息。

也就是说消息是平均分配给每个消费者,并没有考虑到消费者的处理能力。这样显然是有问题的。

3.2.4.能者多劳

在spring中有一个简单的配置,可以解决这个问题。我们修改consumer服务的application.yml文件,添加配置:

spring:
  rabbitmq:
    listener:
      simple:
        prefetch: 1 # 每次只能获取一条消息,处理完成才能获取下一个消息

3.2.5.总结

Work模型的使用:

  • 多个消费者绑定到一个队列,同一条消息只会被一个消费者处理
  • 通过设置prefetch来控制消费者预取的消息数量

3.3.发布/订阅

发布订阅的模型如图:

image-20210717165309625

可以看到,在订阅模型中,多了一个exchange角色,而且过程略有变化:

  • Publisher:生产者,也就是要发送消息的程序,但是不再发送到队列中,而是发给X(交换机)
  • Exchange:交换机,图中的X。一方面,接收生产者发送的消息。另一方面,知道如何处理消息,例如递交给某个特别队列、递交给所有队列、或是将消息丢弃。到底如何操作,取决于Exchange的类型。Exchange有以下3种类型:
    • Fanout:广播,将消息交给所有绑定到交换机的队列
    • Direct:定向,把消息交给符合指定routing key 的队列
    • Topic:通配符,把消息交给符合routing pattern(路由模式) 的队列
  • Consumer:消费者,与以前一样,订阅队列,没有变化
  • Queue:消息队列也与以前一样,接收消息、缓存消息。

Exchange(交换机)只负责转发消息,不具备存储消息的能力,因此如果没有任何队列与Exchange绑定,或者没有符合路由规则的队列,那么消息会丢失!

3.4.Fanout

Fanout,英文翻译是扇出,我觉得在MQ中叫广播更合适。

image-20210717165438225

在广播模式下,消息发送流程是这样的:

  • 1) 可以有多个队列
  • 2) 每个队列都要绑定到Exchange(交换机)
  • 3) 生产者发送的消息,只能发送到交换机,交换机来决定要发给哪个队列,生产者无法决定
  • 4) 交换机把消息发送给绑定过的所有队列
  • 5) 订阅队列的消费者都能拿到消息

我们的计划是这样的:

  • 创建一个交换机 itcast.fanout,类型是Fanout
  • 创建两个队列fanout.queue1和fanout.queue2,绑定到交换机itcast.fanout

image-20210717165509466

3.4.1.声明队列和交换机

Spring提供了一个接口Exchange,来表示所有不同类型的交换机:

image-20210717165552676

在consumer中创建一个类,声明队列和交换机:

package cn.itcast.mq.config;

import org.springframework.amqp.core.Binding;
import org.springframework.amqp.core.BindingBuilder;
import org.springframework.amqp.core.FanoutExchange;
import org.springframework.amqp.core.Queue;
import org.springframework.context.annotation.Bean;
import org.springframework.context.annotation.Configuration;

@Configuration
public class FanoutConfig {
    /**
     * 声明交换机
     * @return Fanout类型交换机
     */
    @Bean
    public FanoutExchange fanoutExchange(){
        return new FanoutExchange("itcast.fanout");
    }

    /**
     * 第1个队列
     */
    @Bean
    public Queue fanoutQueue1(){
        return new Queue("fanout.queue1");
    }

    /**
     * 绑定队列和交换机
     */
    @Bean
    public Binding bindingQueue1(Queue fanoutQueue1, FanoutExchange fanoutExchange){
        return BindingBuilder.bind(fanoutQueue1).to(fanoutExchange);
    }

    /**
     * 第2个队列
     */
    @Bean
    public Queue fanoutQueue2(){
        return new Queue("fanout.queue2");
    }

    /**
     * 绑定队列和交换机
     */
    @Bean
    public Binding bindingQueue2(Queue fanoutQueue2, FanoutExchange fanoutExchange){
        return BindingBuilder.bind(fanoutQueue2).to(fanoutExchange);
    }
}

3.4.2.消息发送

在publisher服务的SpringAmqpTest类中添加测试方法:

@Test
public void testFanoutExchange() {
    // 队列名称
    String exchangeName = "itcast.fanout";
    // 消息
    String message = "hello, everyone!";
    rabbitTemplate.convertAndSend(exchangeName, "", message);
}

3.4.3.消息接收

在consumer服务的SpringRabbitListener中添加两个方法,作为消费者:

@RabbitListener(queues = "fanout.queue1")
public void listenFanoutQueue1(String msg) {
    System.out.println("消费者1接收到Fanout消息:【" + msg + "】");
}

@RabbitListener(queues = "fanout.queue2")
public void listenFanoutQueue2(String msg) {
    System.out.println("消费者2接收到Fanout消息:【" + msg + "】");
}

3.4.4.总结

交换机的作用是什么?

  • 接收publisher发送的消息
  • 将消息按照规则路由到与之绑定的队列
  • 不能缓存消息,路由失败,消息丢失
  • FanoutExchange的会将消息路由到每个绑定的队列

声明队列、交换机、绑定关系的Bean是什么?

  • Queue
  • FanoutExchange
  • Binding

3.5.Direct

在Fanout模式中,一条消息,会被所有订阅的队列都消费。但是,在某些场景下,我们希望不同的消息被不同的队列消费。这时就要用到Direct类型的Exchange。

image-20210717170041447

在Direct模型下:

  • 队列与交换机的绑定,不能是任意绑定了,而是要指定一个RoutingKey(路由key)
  • 消息的发送方在 向 Exchange发送消息时,也必须指定消息的 RoutingKey
  • Exchange不再把消息交给每一个绑定的队列,而是根据消息的Routing Key进行判断,只有队列的Routingkey与消息的 Routing key完全一致,才会接收到消息

案例需求如下

  1. 利用@RabbitListener声明Exchange、Queue、RoutingKey

  2. 在consumer服务中,编写两个消费者方法,分别监听direct.queue1和direct.queue2

  3. 在publisher中编写测试方法,向itcast. direct发送消息

image-20210717170223317

3.5.1.基于注解声明队列和交换机

基于@Bean的方式声明队列和交换机比较麻烦,Spring还提供了基于注解方式来声明。

在consumer的SpringRabbitListener中添加两个消费者,同时基于注解来声明队列和交换机:

@RabbitListener(bindings = @QueueBinding(
    value = @Queue(name = "direct.queue1"),
    exchange = @Exchange(name = "itcast.direct", type = ExchangeTypes.DIRECT),
    key = {"red", "blue"}
))
public void listenDirectQueue1(String msg){
    System.out.println("消费者接收到direct.queue1的消息:【" + msg + "】");
}

@RabbitListener(bindings = @QueueBinding(
    value = @Queue(name = "direct.queue2"),
    exchange = @Exchange(name = "itcast.direct", type = ExchangeTypes.DIRECT),
    key = {"red", "yellow"}
))
public void listenDirectQueue2(String msg){
    System.out.println("消费者接收到direct.queue2的消息:【" + msg + "】");
}

3.5.2.消息发送

在publisher服务的SpringAmqpTest类中添加测试方法:

@Test
public void testSendDirectExchange() {
    // 交换机名称
    String exchangeName = "itcast.direct";
    // 消息
    String message = "红色警报!日本乱排核废水,导致海洋生物变异,惊现哥斯拉!";
    // 发送消息
    rabbitTemplate.convertAndSend(exchangeName, "red", message);
}

3.5.3.总结

描述下Direct交换机与Fanout交换机的差异?

  • Fanout交换机将消息路由给每一个与之绑定的队列
  • Direct交换机根据RoutingKey判断路由给哪个队列
  • 如果多个队列具有相同的RoutingKey,则与Fanout功能类似

基于@RabbitListener注解声明队列和交换机有哪些常见注解?

  • @Queue
  • @Exchange

3.6.Topic

3.6.1.说明

Topic类型的ExchangeDirect相比,都是可以根据RoutingKey把消息路由到不同的队列。只不过Topic类型Exchange可以让队列在绑定Routing key 的时候使用通配符!

Routingkey 一般都是有一个或多个单词组成,多个单词之间以”.”分割,例如: item.insert

通配符规则:

#:匹配一个或多个词

*:匹配不多不少恰好1个词

举例:

item.#:能够匹配item.spu.insert 或者 item.spu

item.*:只能匹配item.spu

图示:

image-20210717170705380

解释:

  • Queue1:绑定的是china.# ,因此凡是以 china.开头的routing key 都会被匹配到。包括china.news和china.weather
  • Queue2:绑定的是#.news ,因此凡是以 .news结尾的 routing key 都会被匹配。包括china.news和japan.news

案例需求:

实现思路如下:

  1. 并利用@RabbitListener声明Exchange、Queue、RoutingKey

  2. 在consumer服务中,编写两个消费者方法,分别监听topic.queue1和topic.queue2

  3. 在publisher中编写测试方法,向itcast. topic发送消息

image-20210717170829229

3.6.2.消息发送

在publisher服务的SpringAmqpTest类中添加测试方法:

/**
     * topicExchange
     */
@Test
public void testSendTopicExchange() {
    // 交换机名称
    String exchangeName = "itcast.topic";
    // 消息
    String message = "喜报!孙悟空大战哥斯拉,胜!";
    // 发送消息
    rabbitTemplate.convertAndSend(exchangeName, "china.news", message);
}

3.6.3.消息接收

在consumer服务的SpringRabbitListener中添加方法:

@RabbitListener(bindings = @QueueBinding(
    value = @Queue(name = "topic.queue1"),
    exchange = @Exchange(name = "itcast.topic", type = ExchangeTypes.TOPIC),
    key = "china.#"
))
public void listenTopicQueue1(String msg){
    System.out.println("消费者接收到topic.queue1的消息:【" + msg + "】");
}

@RabbitListener(bindings = @QueueBinding(
    value = @Queue(name = "topic.queue2"),
    exchange = @Exchange(name = "itcast.topic", type = ExchangeTypes.TOPIC),
    key = "#.news"
))
public void listenTopicQueue2(String msg){
    System.out.println("消费者接收到topic.queue2的消息:【" + msg + "】");
}

3.6.4.总结

描述下Direct交换机与Topic交换机的差异?

  • Topic交换机接收的消息RoutingKey必须是多个单词,以 **.** 分割
  • Topic交换机与队列绑定时的bindingKey可以指定通配符
  • #:代表0个或多个词
  • *:代表1个词

3.7.消息转换器

之前说过,Spring会把你发送的消息序列化为字节发送给MQ,接收消息的时候,还会把字节反序列化为Java对象。

image-20200525170410401

只不过,默认情况下Spring采用的序列化方式是JDK序列化。众所周知,JDK序列化存在下列问题:

  • 数据体积过大
  • 有安全漏洞
  • 可读性差

我们来测试一下。

3.7.1.测试默认转换器

我们修改消息发送的代码,发送一个Map对象:

@Test
public void testSendMap() throws InterruptedException {
    // 准备消息
    Map<String,Object> msg = new HashMap<>();
    msg.put("name", "Jack");
    msg.put("age", 21);
    // 发送消息
    rabbitTemplate.convertAndSend("simple.queue","", msg);
}

停止consumer服务

发送消息后查看控制台:

image-20210422232835363

3.7.2.配置JSON转换器

显然,JDK序列化方式并不合适。我们希望消息体的体积更小、可读性更高,因此可以使用JSON方式来做序列化和反序列化。

在publisher和consumer两个服务中都引入依赖:

<dependency>
    <groupId>com.fasterxml.jackson.dataformat</groupId>
    <artifactId>jackson-dataformat-xml</artifactId>
    <version>2.9.10</version>
</dependency>

配置消息转换器。

在启动类中添加一个Bean即可:

@Bean
public MessageConverter jsonMessageConverter(){
    return new Jackson2JsonMessageConverter();
}
Welcome to Hexo! This is your very first post. Check documentation for more info. If you get any problems when using Hexo, you can find the answer in troubleshooting or you can ask me on GitHub.

Quick Start

Create a new post

$ hexo new "My New Post"

More info: Writing

Run server

$ hexo server

More info: Server

Generate static files

$ hexo generate

More info: Generating

Deploy to remote sites

$ hexo deploy

More info: Deployment